Back To Porridge

Porridge, when made the right way, is a lovely thing indeed. It’s perfect for those days when all you want for breakfast is something warm and comforting, containing only a few simple ingredients.

This past week I’ve been all about the porridge. I’ve been having it every single morning. I caught myself thinking about it late one evening and was wondering about the pre-soaking stage some people do before actually cooking it. I know it’s traditional and all, but does it really make much of a difference? For the amount of effort which actually goes into it, I thought I’d give it a go. From boiling the kettle it literally took me all of 20 seconds, and you know, I think I’m a convert. This extra little step really helps in softening the oats so that when they’re cooked the overall texture is nice and creamy.

It seems almost funny giving you a recipe for porridge because it’s one of those things that epitomises the word ‘basic’. People don’t tend to get over-excited about it. I really like it though. And that term ‘Back to Porridge’? Come on, what is that all about? Don’t say it like it’s a bad thing! I may have to reinvent the phrase and just start using it more positively. “What time is it?! Morning?? Oooh! Back to porridge!”

I think the trick to making a really tasty porridge is all in the amount of time it cooks for. Soaking the oats overnight does cut back on the cooking time a little, but even so, I still like to simmer it for a good 20 minutes or so. This recipe is so easy it almost isn’t one and takes very little effort on your part, so get it in your repertoire!

The Perfect Bowl of Porridge – Serves 1 very hungry individual

1/2 cup organic rolled oats

1 cup freshly boiled water

1/2 cup milk

a pinch of sea salt

Method

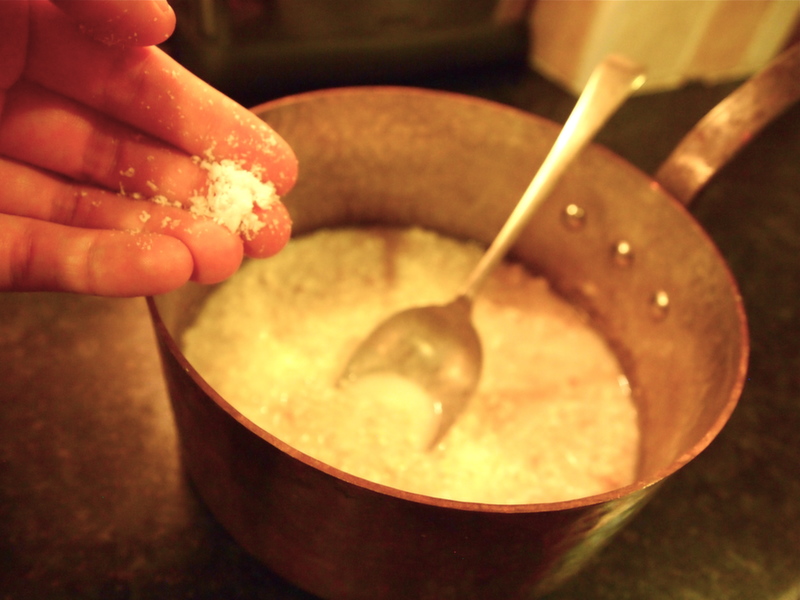
Put the oats in a saucepan and add the hot water and pinch of salt. Give it a stir, then cover with a tea towel overnight.

Organic Rolled OatsOrganic Rolled OatsPorridgePorridgePorridge

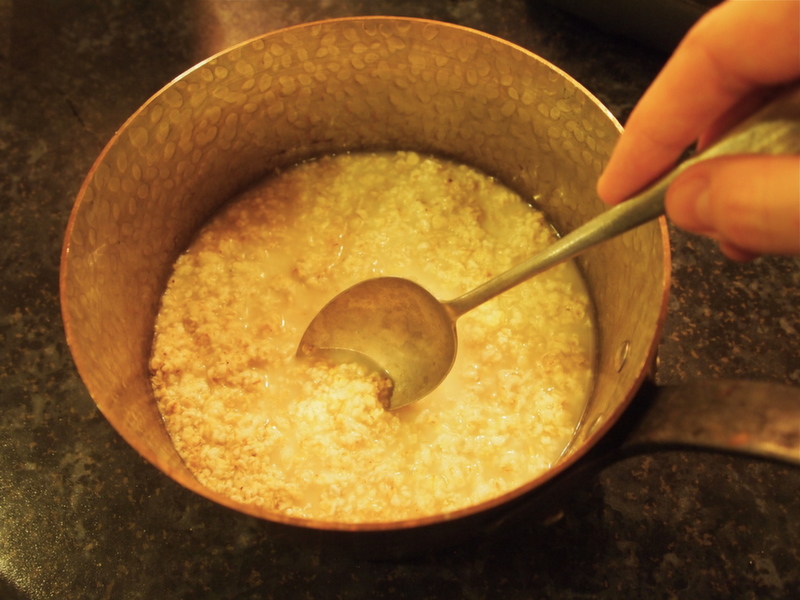
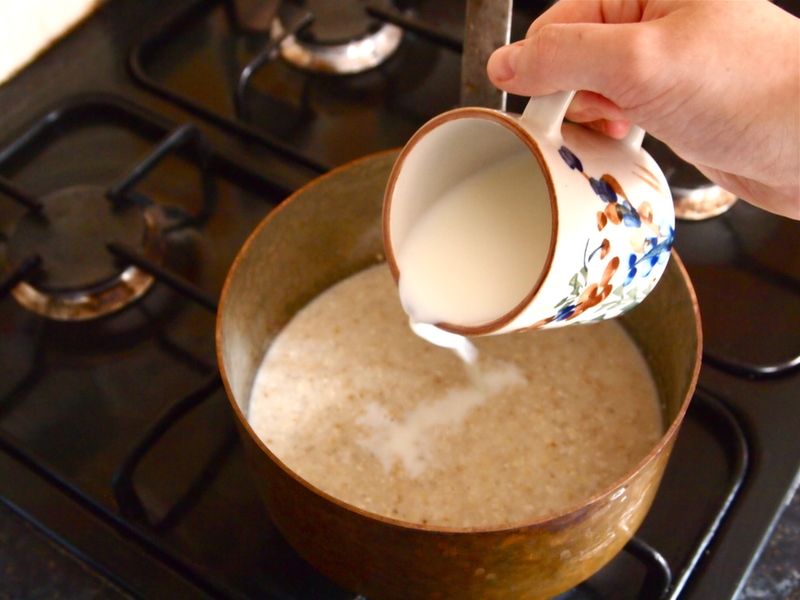
The following morning, add the milk to the soaked oats and simmer for about 20 minutes on the lowest heat possible. Add a little extra milk if it gets too thick or dry.

PorridgeOLYMPUS DIGITAL CAMERA

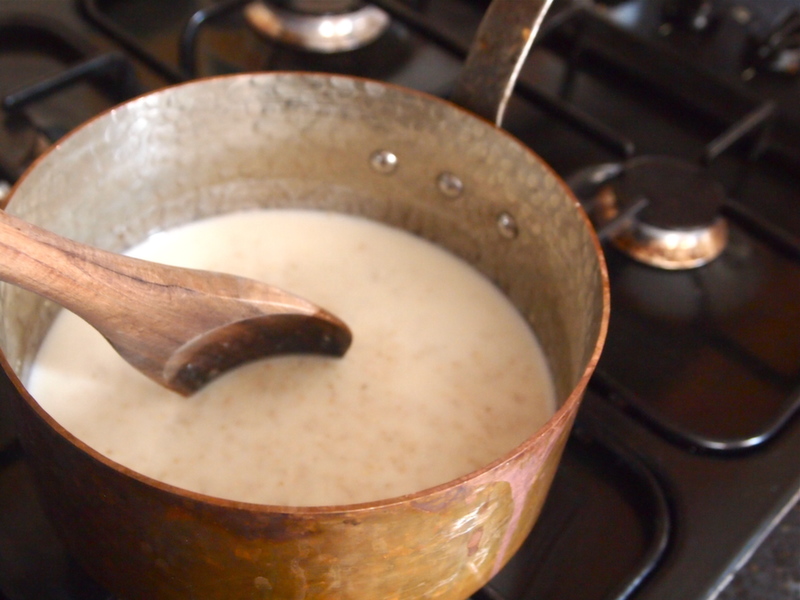
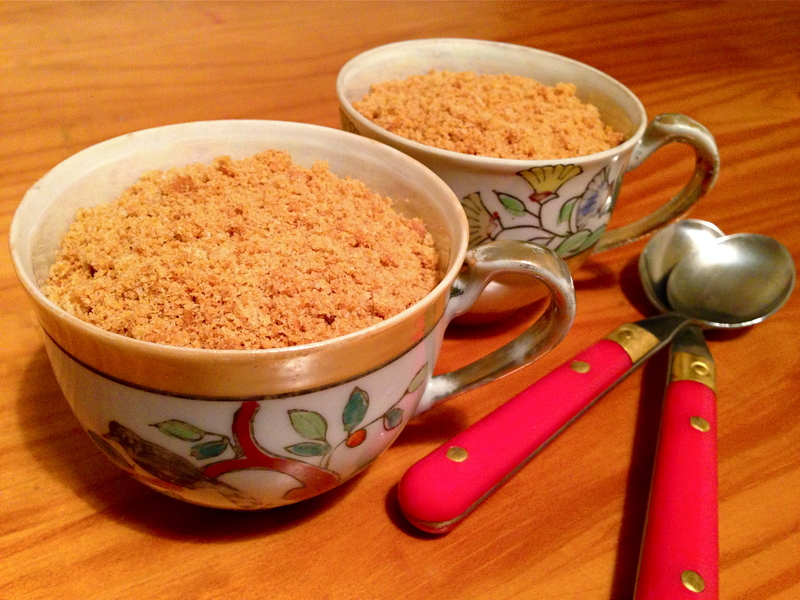
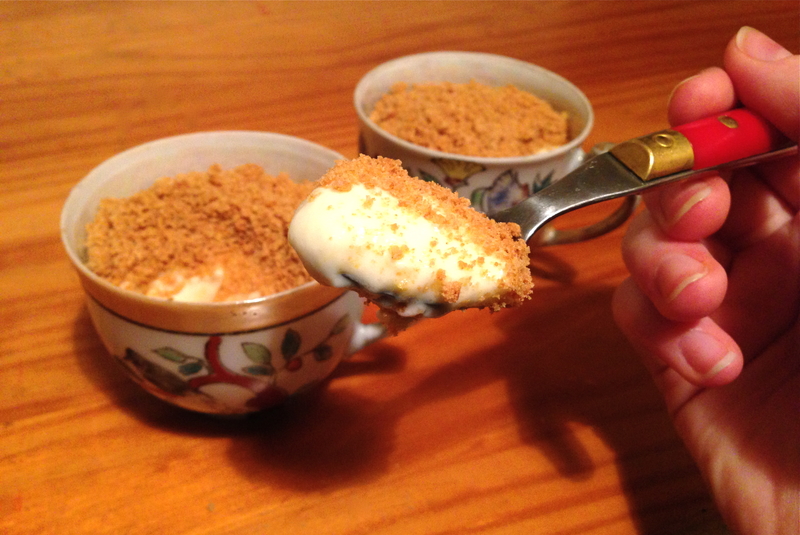
After simmering, your porridge should have thickened to a nice creamy consistency. Now get it into a bowl because it’s almost ready to eat!

Porridge

I usually eat mine with a squeeze of honey or maple syrup, but this week I’ve reverted back to my childhood and have been really enjoying it with a bit of soft brown demerara sugar and a splash of milk. That is where it’s at.

PorridgePorridge

If you forget to soak the oats the night before it’s not the end of the world! Just soak them for about 15 or 20 minutes prior to cooking, then simmer for about half an hour adding a little extra milk if necessary.

For this recipe I specify a half cup measure of oats, an American measurement which holds 125ml, but really any small mug will do.

Porridge is great eaten with so many different toppings: Maple syrup, honey, or agave nectar. Whatever nuts and seeds you happen to like. Try it with some dried fruit, like raisins or sultanas, figs, sour cherries or dates, or fresh fruit like sliced juicy pears, peaches or nectarines. Another good combo you should try is banana and peanut butter – Just stir in a spoonful of peanut butter into the porridge towards the end of the cooking time along with some sliced banana. When the banana is stirred into the hot porridge it gets a little cooked and becomes reminiscent of the inside of a banana fritter… Yeeaahh that’s right! If that, for some reason unknown to me, is not your thing, just slice some over the top once it’s in the bowl. Whichever topping you decide to opt for, it will taste great, and if not, I will eat my hat, so pick a good’un because I don’t really want to, okay? Thanks.

Super Tuber!

Last week I tried my very first Japanese sweet potato, known in Japan as Satsuma-imo. I’m already a big fan of the standard orange fleshed variety, but I was fancying something a little different so I thought I’d give these ones a shot. Aesthetically they look lovely! The skin is a nice vibrant reddish colour with slight traces of purple and they have a creamy white interior. I wanted to cook them very simply this time so their true flavour would shine through without any distractions.

Japanese Sweet Potato

All I did with these little babies was preheat the oven to 180°C, wash and dry them, then loosely wrap up each potato with a small splash of oil in some tin foil. You can also add a pinch of salt if you feel that way inclined, or just leave them as is like I did. Make sure you scrunch the seam of the foil up nice and tight though so none of the moisture escapes. This moisture helps steam the potato cooked, but because it’s being baked in the oven the base gets a little bit crisp and chewy! The best bit!

Japanese Sweet Potato

Put your litte foil parcels on a baking tray and bake them for around 45 minutes to an hour. The cooking time will vary a bit depending on the size of the sweet potatoes and how hot your oven gets, but just check by piercing them with a knife and if they seem soft and the knife goes in with very little resistance then they’re done!

Japanese Sweet Potato

The first one I had I ate completely plain so I could appreciate the flavour for what it was, and it is by all means a natural beauty! It was lovely and sweet and had a slightly drier texture to the usual orange fleshed kind. Not in a bad way though. It actually made it taste reminiscent of chestnuts, which I love, so that was a very nice surprise! No. 2 was enjoyed with a slick of butter and salt and pepper! Both tasted good in different ways. I’m pretty sure Satsuma-imo connoisseurs in Japan who buy theirs fresh from the market, plucked straight from their garden or from street vendors who cook then bury them in gravel to retain their moisture, would consider putting anything on top of these beauties sacrilege! I do agree though, they don’t really need anything, except maybe a glass of milk to drink alongside which I hear is traditional? I never thought Japan, or any Asian country for that matter, was a country of milk drinkers. I digress. As I was saying, they taste amazing all on their own. If it went on the X-Factor, it would be one of those contestants that are just naturally really good and unassuming – no gimmicks, flashy lights or manic cheesy backing dancers necessary. Let’s face it though, it would get kicked out. The best ones always do.

So, maybe I’m just going through a phase, but these tasted like the best sweet potatoes I’ve ever had. I’ll definitely be picking up some more next time I see them.

Japanese Sweet Potato

Japanese Sweet Potato

• I used a nice cold pressed Irish rapeseed oil that’s produced by Derrycamma Farm in Co. Louth to drizzle on top before baking. It has a subtle nutty flavour that I really like, but it is quite mild so use whatever you have at hand, whether it be olive, groundnut or sunflower oil, they’ll all work just as well!

Focaccia self on and make some bread

There are very few smells I can think of that can compete with the wonderful aroma of freshly baked bread. It’s nice how something so simple, which uses only a few basic ingredients, can produce one of life’s greatest comfort foods and make a house feel so homely. I find it to be a very satisfying thing to make and really enjoy each stage of the process, from the therapeutic kneading of the dough to seeing it rise into a gloriously billowing pillow of puffiness. Try that for a tongue twister!

Reading an article from The Independent, it would seem that the aroma of freshly-baked bread has even more than just the power to make your mouth water. According to a new study carried out by the University of Southern Brittany in France, it can also make you a kinder person! They found that shoppers were more likely to alert a random passerby that they had dropped a belonging if, at the time, they were also passing a bakery, filling the air with the sweet scent of fresh bread. Who would have thought that something as simple as the humble loaf would lead to a greater degree of altruism in strangers?

On a whole, I don’t actually buy a huge amount of bread, which is why I enjoy taking time out to make my own on days when there’s nowhere I’d rather be than in the kitchen. I quite relish time spent pottering about in my kitch! There’s also so many types of bread to choose from, but this time around I was in the mood for nothing other than a really tasty focaccia, laden with lots of good extra virgin olive oil, sweet cherry tomatoes, basil and rosemary.


Tomato, Basil & Rosemary Focaccia –

Adapted from ‘Jamie’s Kitchen’

(Make 2 big breads or one HUGE one!)

30g fresh yeast / 3 x 7g sachets or 21g dried yeast

30g honey or sugar

625ml / just over a pint of tepid water

1kg / 2.2lb strong bread flour

30g maldon salt / 15g fine sea salt

Topping

500g / about 1lb flavourful cherry tomatoes

10 Tablespoons / 150ml extra vigin olive oil

a big handful of fresh basil leaves

a stalk of rosemary, leaves chopped

maldon salt & freshly ground black pepper

some extra flour for dusting

Method

Dissolve the yeast and honey or sugar in half of the tepid water.

Add the salt to the flour and tip onto a clean surface or into a large bowl. Make a well in the centre and pour in all the dissolved yeast mixture. With one of your hands, use a circular motion to combine the two, starting in the centre and moving outwards until all the liquid has been soaked up. Pour the other half of the tepid water into the centre and gradually incorporate all the flour to create a moist dough. (Certain flours may need a little more water depending on what brand you’re using, or even due to varying degrees of humidity in the atmosphere, so if you think it looks a bit too dry don’t be afraid to adjust the quantities! Trust your own judgement!)

Tomato and Herb Focaccia

Now it’s time to get kneading. My favourite! This is also a very important stage when making most types of yeasted breads, as it is this stretching and folding technique which develops the gluten and structure of the dough, giving it the desired lovely springy texture.

Firstly, dust the work surface with a little flour and begin pushing and folding the dough with the heel of your hand, maybe even giving it a slight turn every now again. You want to keep doing this for about 10 minutes until the dough feels nice and smooth. A telltale sign that you’ve kneaded enough is if you press your finger gently into the dough it should spring right back again.

Flour both of your hands and lightly flour the top of the dough as well. Make it into a roundish shape, place it on a large baking tray and make a deep score in it with a sharp knife. This will allow it to relax and prove with ease until it has doubled in size. Cover the dough loosely with clingfilm or plastic wrap and leave it for about 45 minutes, ideally in a warm, draught-free place.

Whilst it’s proving, put the cherry tomatoes into a bowl and cover with all of the olive oil.

Once your dough has proved and doubled in size, knock all the air out of it then put it onto a floured surface. At this point it’s up to you whether you want to make a really large focaccia or two smaller ones. I opted for one big one this time, but to be honest, unless you have a pretty huge baking tray I’d probably suggest making a couple of smaller ones. My baking tray just about fit into the oven and also just about held all the dough. Any smaller tray and you’re liable to have olive oil all over your oven! Definitely not a fun job to clean up after!

Flatten the dough out until it’s about 2.5cm / 1 inch thick and transfer it onto a floured baking tray. Push it right out to the corners so that it completely fills the tray. Pour over the tomatoes and all the olive oil, then sprinkle over the basil which you can tear up a little with your fingers as well as the chopped rosemary. Push your fingers through the dough, almost to the bottom of the tray, making indentations across the whole thing. The purpose of doing this is so that you get nice little pools of olive oil which the bread will soak up during cooking and, therefore, make it taste incredible. It also gives the focaccia it’s trademark dimpled good looks!

Tomato and Herb Focaccia

Tomato and Herb Focaccia

Leave to prove again for about half an hour or until it has doubled in size, then sprinkle it with the flaky maldon sea salt and black pepper.

Carefully place it into an oven preheated to 220°C/430°F for about 20-25 minutes, until the bread is crisp and golden on top and soft in the middle. Drizzle with a little more extra virgin olive oil once you take it out of the oven.

Tomato and Herb Focaccia

Focaccia is an indispensable bread to have in your repertoire because it lends itself so well to a myriad of different toppings. Use anything from olives, to anchovies, red onions, to garlic or deliciously sweet roasted peppers. Make whatever takes your fancy!

This recipe can be made vegan by simply using sugar instead of honey.

Nigel Slater made some good suggestions about what to pair with leftover focaccia in an article he wrote for The Observer:

“The next day, most hearth breads are still edible, but even the proudest home baker will concede they have lost their initial temptation. This is the point at which I split them through the middle, toast them lightly, and stuff them with whatever is appropriate or to hand. Cheeses, the more squidgy and milky the better; little hillocks of salad leaves; sun-dried tomatoes (for once in the right place); sexy spreads of crushed olives and anchovy; casual folds of parchment-fine ham; fat-bespeckled salami. A good lunch yesterday was a piece of taleggio and some mashed olives trapped between two slices of the day before’s bread, grilled not until the cheese was golden, but just until it starts to slide.

The bread’s last incarnation came this morning, torn into rough nuggets and dumped at the bottom of a couple of deep soup bowls. I covered it with a ladle or two of steaming chicken stock, a handful of shredded, blanched spring greens (so bright, so full of life) and a further trickle of olive oil. My bread was used down to the last juicy, salty crumb.”

Yes I know, there’s just so many options!

But if push comes to shove, I’ve got two words for you… sexy spreads.

Too Hot? Too Spicy? Hot Hot!

It’s no secret that I am a big chilli fan. Sometimes I have to stop myself from putting it in just about everything! There’s just something about the fresh flavour they impart as well as their varying degrees of tongue numbingness that I love and cannot seem to get enough of. And they’re SO versatile. Chilli and chocolate anyone? They are a match made in heaven. After two and a half years of my cooking, Martina has gained quite the chilli tolerance too and can take it like a pro. I feel so proud! Or should I say, after two and a half years of subtly upping the quantity of spice she has not yet noticed! Scooore! I think that is a job well done. Little does she know I’m priming her for a really insane, Man v Food style chilli eating contest! Mwahahaa!*

Chillies come in so many different forms and can be used in a multitude of ways. The ones that are in constant rotation in my kitchen are fresh red and green chillies, dried chillies, Kashmiri chilli powder, the Malaysian sambal oelek, shichimi (Japanese 7 spice powder) Sriracha hot sauce (the Hollywood A-lister of the condiment world, created by Chinese-Vietnamese founder David Tran), a crispy chilli in chilli oil that has fried shallots in it and a photography of a very serious looking Chinese lady on the front and most recently gochujang, a fermented Korean condiment made from red chillies, glutinous rice, fermented soya beans and salt. It would seem I have the bulk of Asia covered! And they’re all fantastic in their own unique way. Oh, and those pickled green chillies you sometimes get on the side when you order falafel? Uhh yes please! Who could refuse that tangy, spicy kick in the tastebuds?!

I do realise that not everyone’s such a huge fan though and people are often told to stay away from spicy foods when they’re feeling unwell. I don’t know about you, but sometimes when I am sick that’s what I find myself craving, especially when I have a cold or I’m feeling congested. At times like this I imagine something hot and fresh, like Tom yam soup, will cut through the sick feeling and come out triumphant! (or at least shoo it away a little faster.) It may not be the best thing to have if you have a stomach bug, but according to Wikipedia, the online fountain of knowledge, chillies are a safe and effective way in relieving arthritis pain, shingles, diabetic neuropathy and headaches. Not that I needed convincing, but anyways, I’m sold!

With the amount of chillies that I use in my cooking, I thought it was about time I grew my own. My sister Rachel bought me a nifty little grow your own tin, well, ages ago (sorry Rachie!) that I had yet to use, so yesterday I cracked it out to hopefully send myself on my way to chilli nirvana!

Here look, isn’t it cute? I can’t wait to see all those little Italian chillies start to flourish!

Chillies in a tin

According to psychologist Paul Rozen, eating chillies is a prime example of a “constrained risk”, like riding a roller coaster, so people can enjoy the feelings of pain and fear because they know that these sensations are not actually harmful. This method lets people experience extreme feelings without any risk of bodily harm.

That says it all: If eating chillies is being compared to riding roller coasters, they must be pretty damn amazing.

* And no, I am not ACTUALLY entering Martina into a chilli eating contest. The idea is to help increase tolerance, not annihilate her poor little tastebuds!

Hola Hibiscus!

I’ve just recently become acquainted with the hibiscus. Yes, I’ve known about this beautiful flower for a long time but have never really taken a profound interest in it, afterall, it’s just a flower, right? Well it is, but it has much more to it than mere aesthetics.

HibiscusThe hibiscus is considered to have various medical uses in Chinese herbology from skincare, where it’s been shown to function as an anti-solar agent by absorbing ultraviolet radiation, to acting as an ailment for coughs, hair loss and hair greying.

It is also the national flower of Malaysia, where all my family on my mum’s side are from. There it is known as Bunga Raya, literally translated as ‘big flower’. It was introduced into the Malay Peninsula in the 12th century and was nominated as the national flower in 1958 by the Ministry of Agriculture amongst a few other flowers, such as ylang ylang, jasmine, lotus, rose, magnolia and medlar. On 28 July 1960, it was declared by the government of Malaysia that the hibiscus would be the national flower. The red of the petals symbolizes the courage, life, and rapid growth of the Malaysian people and the five petals represent the five national principles of the country. These are a belief in god, loyalty to king and country, supremacy of the constitution, rule of law and courtesy and morality. The flower is also found imprinted on the notes and coins of the Malaysian Ringgit.

That is not where it ends though. When hibiscus flowers are dried they also have multiple culinary uses. Soak them and watch whilst the water turns the brightest crimson hue! The flavour is very sour and slightly reminiscent of cherries which lends wonderfully to delicious drinks, in particular ‘Agua de Jamaica’ (pronounced Ha-mike-ah), or ‘Flor de Jamaica’ as it’s known in Mexico.

Agua de Jamaica, (Adapted from ‘Paletas, by Fany Gerson)

Makes 6 cups

1 1/2 cups dried hibiscus flowers

6 cups cold water

3/4 cup caster sugar

 Method
Rinse the flowers in cold water then drain them thoroughly. Put them in a saucepan with the water, and let steep for at least 4 hours but preferably overnight.
Agua de Jamaica
Bring the mixture to a boil over medium heat, then lower the heat and simmer for 10 minutes. Pour in the sugar and stir until it’s dissolved. Let cool to room temperature. Strain through a fine-mesh sieve into a pitcher or large jug, pressing the solids with the back of a spoon to extract as much liquid as possible. Refrigerate until chilled and taste, adding more water if you think it’s too concentrated. Serve over plenty of ice. I also added some mint and a few slices of lime. Very zingy and refreshing!
Agua de Jamaica
Agua de Jamaica
Agua de Jamaica isn’t an overly sweet drink. I think of it as more of an iced tea really, but feel free to add more sugar if you think it might need it, or better yet, if you have some sugar syrup on hand you can add it to taste before serving! Now I’d suggest you go and find yourself some dried hibiscus and get well and truely quenched!

Date Night

Sometimes a recipe will come into your life that you will fall in love with and not be able to live without. I believe I have found the one. Surprisingly, it is not what you may think. No, it’s not a cake or pastry, nothing sweet for that matter. It’s not deep fried or saturated with fat, but actually rather healthy. It’s a salad. However, salad is a very general term which, for many, conjures up thoughts of a slice of anaemic tomato on a semi-wilted lettuce leaf. Don’t worry though, this salad could not be further from that! This salad ain’t no lardy boy. You’re looking at a total and utter stud.

Each person I have made this baby spinach salad with dates and almonds for has been blown away by it, as am I, and continue to be every time I eat it. It’s nice and simple, but it is so much greater than the sum of it’s parts, as the flavours are so perfectly balanced; A bit spicy, a nice tartness from the sumac and lemon, lovely sweet/sour caramel notes from the marinated dates with a savoury hit of onion, the crunch from the fried bread and almonds enriched with a small slick of butter and the crisp baby spinach all work together in perfect harmony! My mouth is watering just thinking of it, for goodness sake!

This little gem is so very tasty, I feel that I could eat it every day and not get sick of it. That’s really saying something, right? I’m not sure I’d want to risk it though. Martina and I eat dinner together every day and like trying different things. I think it’s key to make sure there’s some kind of vegetable or salad with most meals since it’s not only nutritionally beneficial, but the lack of colour on the plate would do my head in. So, at Martina’s suggestion we have decided to have it at least one night a week, and that’s totally fine by me!

Baby spinach salad with dates & almonds – Serves 4

(From ‘Jerusalem’, by Yotam Ottolenghi & Sami Tamimi)

1 Tablespoon white wine vinegar

1/2 medium red onion, thinly sliced

100g pitted medjool dates, quartered lengthways

30g unsalted butter

2 Tablespoons olive oil

2 pitas, roughly torn into 4cm pieces

75g whole almonds, roughly chopped

2 teaspoons sumac

1/2 teaspoon chilli flakes

150g baby spinach, washed

2 Tablespoons lemon juice

salt

Method

Put the vinegar, onion and dates in a small bowl, then add a pinch of salt and mix well with your hands.

Leave to marinate for 20 minutes, then drain any residual vinegar and discard.

Spinach Salad 1

Meanwhile, heat the butter and half the olive oil in a medium frying pan. Add the pita and almonds and cook them on a medium heat for 4-6 minutes, stirring all the time, until the pita is crunchy and golden brown. Remove from the heat and mix in the sumac, chilli and 1/4 teaspoon of salt. Set aside to cool.

Spinach Salad 2

When you are ready to serve, toss the spinach leaves with the pita mix in a large bowl. Add the dates and red onion, remaining olive oil, lemon juice and another pinch of salt. Taste for seasoning and serve immediately.

Spinach Salad 3

Spinach Salad 4

• The crunchy pita croutons can also be used to top soups as a nice alternative to regular croutons. They will keep for at least a week in an airtight container.

Yotam & Sami suggest serving this salad as a starter to really whet the appetite. I think that would be lovely, however this time I ate it as a main course alongside some chicken I had rubbed with spices, spatchcocked, then roasted on thick wedges of red onion and it was delicious. I kept the legs for the following day then tore the meat off the bone and added it to the rest of the salad, along with the roasted onions. Never have I tasted a salad more intensely moreish!

Animals? I like that they stay standing up.

I watched a very sweet video yesterday of a little boy called Luiz Antonio questioning why we eat meat. There’s really no messing around with all the ins, outs and intricacies of the subject in question.

I loved how straightforward his argument was;

“I don’t like that they die, I like that they stay standing up. These animals, you gotta take care of them..and not eat them!”

That being said, I am not vegetarian myself. However, I was vegan for about a year and a half as an experiment for myself. The aim was to give myself more of a challenge when cooking meals and force myself to think outside of the box a little more, not to mention I also find the thought of spookily reared meat incredibly offputting. I think when you see a chicken being sold for a couple of quid it’s time to step back and question how supermarket chains are able to sell meat that cheaply whilst simultaneously making a considerable profit from it. It’s definitely steeped in inhumane practices. The thought of eating something that has been pumped full of hormones in order to encourage fast growth, is enough to make me want to cut out the meat and bulk buy some lentils instead.

When Life Gives You Lemons, It’s Time for Dessert.

It was my birthday last month, and being someone who loves to read and cook to my heart’s content, I must admit.. I pray for cookbooks. It may sound corny, but my heart jumps with glee when I unwrap one. No joke.

This year, my sister Rachel sent me the new book by Hugh Fearnley-Whittingstall, ‘Hugh’s Three Good Things on a Plate’. I’ve always been a big fan of Hugh and the folks at River Cottage due to their wonderful food ethos and hard-hitting campaigns on animal welfare and fish sustainability, as well as promoting the act of growing your own fruit and vegetables and living off the land.

https://i0.wp.com/sphotos-a.xx.fbcdn.net/hphotos-frc1/p480x480/598493_384967811584063_62273734_n.jpg

I really like the simplicity of this book. There are no overly fussy recipes in sight or ingredient lists the length of your arm and in cooking there doesn’t need to be. I really believe that if you use the freshest, best quality ingredients you can find, they will sing all by themselves with very little help. Although there are generally more than three ingredients used in each of the recipes, there are three ‘main’ ingredients that comprise each dish.

As it says in the introduction:

“This book is not about exotic ingredients or trendy techniques. Nor is it a polemic about shunning certain foods or worshipping others. It’s about recognising a simple pattern that already underpins many well-loved dishes.. They [are usually] little more, and little less, than three good things on a plate.”

Living with Martina, who, when it comes to biscuits, is all about the gingernut, the obvious three good things to tackle first was the condensed milk, lemon and gingernut combo. I say ‘tackle’, but there is really little more to do than mixing them together with some double cream, so it was deceptively easy. Great when you know you’ll want dessert after dinner but are strapped for time, or cash for that matter! It’s very much a store cupboard kind of recipe afterall. The condensed milk and biscuits will last in the cupboard for ages and if you happen to have a few lemons knocking about in your fridge like I tend to, then all you have to get is some cream! A nice solid standby recipe that can be whipped up at a moments notice, then left to do it’s thing in the fridge.

Lemon Pudding 1

Lemon Pudding (Serves 6)

(From ‘Hugh’s Three Good Things on a Plate, by Hugh Fearnley-Whittingstall)

“This is an incredibly easy and deliciously retro pud. The idea of ‘setting’ condensed milk with lemon juice goes back to recipes-on-the-back-of-the-tin in the 1970’s, or earlier. It’s a neat trick, and a yummy one. The lemon cuts the intense sweetness of the condensed milk perfectly and the crushed biscuits on top give a sort of upside-down-cheesecake effect.”

4 large lemons

400g tin sweetened condensed milk

150 ml double cream

12 gingernut biscuits

Method

Finely grate the zest of two of the lemons. Squeeze the juice from all of them and strain it to remove any pips and fibres. Measure out 150ml strained juice.

Tip the condensed milk into a large bowl and stir in the cream. Add the lemon zest and juice and stir until the mixture is thick and smooth.

Divide evenly between 6 small cups or glasses and chill for several hours, until set.

Crush the biscuits to fine crumbs and scatter thickly over the top to serve.

Lemon Pudding 2

 I only needed 3 lemons when I made this to get the 150mls of juice you need, but maybe have a fourth one handy just in case. Best to have too much than too little I guess. I didn’t see the need in straining the juice either and it turned out just fine, no fibres or pips to be found!

Oh, and whilst we’re on topic, I am wholeheartedly a sucker for condensed milk. Oh sorry, I meant pure condensed ethereal joy. Old-fashioned it may be, but this stuff is like sweet liquid manna sent from heaven!

Hummus be kidding me!

Hummus. That simple dish of chickpeas blended with a little tahini, lemon juice, garlic and salt, that somehow manages to have the allure of something much grander. The debate over hummus is ongoing, from where in the Middle East it originated to how it should be prepared and eaten. Chunky or smooth? Warm or room temperature? Blended with or without olive oil? Served as is or with a topping?

And so the list goes on.

I would like to stop for a second and take a breath from the many variations out there, and give you a simple recipe for the hummus I made for lunch today. This came about from not knowing what to make, and after a quick brain rumage of what was in the cupboard I decided I needed to get my hummus on! I realise from past experiences that hummus can be really expensive depending on where you buy it from. Criminal, since it’s generally a very cost efficient thing to make. Since it came to me as a bit of a last minute idea, I made it with a tin of chickpeas instead of going through the whole dried chickpea soaking process. This made it incredibly fast to whip up and took very little work on my part. What I did do, however, was pinch those bad boys out of their little white jackets. I felt in the mood for a nice smooth dip today, so the skins were happily discarded! This is the first time I’ve ever been so precious over a bowl of hummus, but I must say, it was definitely worth the extra smidge of effort and it really didn’t take much time at all. Either way, consider it a labour of love! The silky smoothness was a lovely change from the coarser stuff I’ve become accustomed to, so give it a go and see which way you prefer!

Hummus

Hummus & Pitta Chips

1 tin of chickpeas, skins removed

80 mls (1/3 cup) tahini (sesame paste)

juice of half a lemon, or to taste

1 garlic clove, crushed

salt, to taste

approximately 60 ml (1/4 cup or 4 Tbsp) very cold water

A generous slosh of extra vigin olive oil

1 small tomato (optional)

A sprig of fresh thyme (optional)

A sprinkling of sumac (optional)

A few pitta breads

Method

Place the chickpeas into the bowl of a food processor, reserving a small handful for sprinkling over at the end, and blend to a stiff paste. With the machine still running, add the tahini, lemon juice, garlic and a generous pinch of salt. Add the water in a slow, steady stream, blending until you have a very smooth and creamy paste. Cover the surface with clingfilm and leave to rest for about 30 minutes.

In the meantime, preheat the oven to 200 C.

Cut the pitta bread in half, then into wedges. Put them on a baking tray and coat generously in olive oil, salt, pepper and any other spices you might want. I put cumin seeds on mine, as well as a some Japanese shichimi for a slight kick of heat. Put them in the oven for about 15-20 minutes, or until golden brown.

Top the hummus with a healthy dose of extra vigin olive oil, the remaining chickpeas, some fresh thyme leaves and a small tomato chopped up. Sprinkle with a pinch of salt and some deliciously tangy sumac if you have it.

Now, go and have a tasty lunch and enjoy!

• Hummus is such a super food. A ‘superfood’ in the health kick sense of the word, yes, but really, even more literal than that. It is a super. food. SUPER! I kid you not. It’s cheap and cheerful, tastes wonderful, is satisfyingly filling, healthy and a snap to make. Try to use nice large, soft chickpeas for this. After years of trying different brands from various places, I’ve come to the conclusion that ones you get in Asian supermarkets tend to be vastly superior. Don’t get me wrong, they cost very little, actually probably much less than those from the major supermarkets but the difference in texture is phenominal. Deliciously soft and yielding as opposed to small, hard pellets that are not a pleasure to eat at all! What is that all about?!

Also, bear in mind that these toppings are completely optional. It will still be really tasty with nothing but a splash of olive oil on top! I like to serve some raw veggies on the side too, such as nice fresh carrot sticks or pieces of cucumber with the seeds removed to dip into the remaining hummus.

I remember a couple of years ago reading a wonderful article Yotam Ottolenghi wrote for The Guardian’s Word of Mouth blog called ‘The Perfect Hummus Debate‘, where he goes into more detail about this little wonder of the culinary world! If you’re interested in a little extra light reading, this is well worth a look at. Especially if you want a lovely recipe for hummus with ful, and who in their right mind wouldn’t?!

Finding Joy in the Teenie Things

“If you had one shot, one opportunity, to seize everything you ever wanted.. one moment. Would you capture it or just let it slip?”

If you were Charles “One Shot” Harris  you would capture this:

One Shot HarrisCharles “Teenie” Harris, as he was also often known, was an accomplished African-American photographer from Pittsburgh, Pennsylvania. Teenie photographed many celebrities who were visiting his hometown, such as Martin Luther King, John F. Kennedy, Richard Nixon, Eleanor Roosevelt, Louis Armstrong, Ray Charles, Sam Cooke, Duke Ellington and Muhammad Ali. However, from 1936-1975 he also chronicled life within the black neighbourhoods of the city for the Pittsburgh Courier, one of America’s oldest black newspapers. Harris took more than 80,000 images during his career and was nicknamed “One Shot” because he very rarely made his subjects sit for retakes. The candid nature of this photo is what makes it so perfect afterall. A moment like this is fleeting and could be lost in mere seconds, so another attempt to recreate something this intense yet still natural would likely fall flat. The look of elation and utter euphoria on this little boys face at the cotton candy booth is priceless, and seemingly contagious, as I feel overjoyed just looking at it!

I hope this makes you smile, and I cannot believe I just quoted Eminem.