A Savoury Nibble

I often have a bit of a savoury tooth when it comes to snacking. I do love cake, my sweet sweet downfall, but when it comes to chocolate or biscuits and that sort of thing, I’d usually pass them up in a heartbeat for something saltier; a packet of crisps say, or some pitta chips with a tasty dip and a side of crunchy vegetables.

Lately I’ve spent a lot of my free time having a good drool over the food in the Honey & Co. cookbook. It all looks so delicious it’s hard to know where to start, but I noticed a recipe for Bouikos which they describe as little cheese buns native to the Balkans. To me, they taste like a really flaky savoury scone turned amuse bouche. On biting into one of these tantalising wee triangles my ‘bouche’ was certainly amused. Tender cheesy goodness, they really hit the spot!

Bouikos

Bouikos

100g plain flour

50g cold butter

40g mature cheddar cheese

40g feta

a pinch of salt

50ml sour cream

1/2 teaspoon nigella seeds

2 spring onions, sliced

milk, to glaze

Method

Cut the butter into small cubes, grate the cheddar cheese and crumble the feta, then combine all the ingredients together. Work the mixture together with your hands until it just combines. Lumps of butter and cheese are exactly what you want in this dough, because when you bake it they will melt and be so tasty!

Put the dough on a lightly floured work surface and pat it into a rough rectangle roughly 2-3cm thick. Flour the blade of your knife, cut the dough in half lengthways, slice across three times to divide it into six squares, then cut each of these corner to corner to make twelve small triangles. You could shape these into any shape you like though, however it might mean re-rolling the offcuts which has the potential of making them ever so slightly tougher.

Preheat your oven to 220°C/200°C fan/gas mark 7.

Brush the tops with a little milk for a glossy finish. Bake on a lined baking tray on the upper-middle shelf of the oven for 10 minutes. Open the oven and carefully turn the tray around, then reduce the temperature to 200°C/180°C fan/gas mark 6 and bake for a further 6-8 minutes until they are golden.

These can be eaten straight away or cooled on a tray until ready to be served. They do taste best though when eaten on the same day.

• What’s especially nice about this recipe is that it takes hardly any time to whip up, but they also freeze really well raw. Freeze the triangles on a flat tray with a bit of space in between each of them, then once they’re fully frozen pack them into a container or freezer bag. You could easily keep a ziplock bag of these in the freezer so they’re ready to just pop in the oven when snacks are called for, just make sure you let them thaw for a short while at room temperature before baking, between 30 minutes to an hour if possible. Now you have a nice nibble on backup for a rainy day! BOOM.

Focaccia self on and make some bread

There are very few smells I can think of that can compete with the wonderful aroma of freshly baked bread. It’s nice how something so simple, which uses only a few basic ingredients, can produce one of life’s greatest comfort foods and make a house feel so homely. I find it to be a very satisfying thing to make and really enjoy each stage of the process, from the therapeutic kneading of the dough to seeing it rise into a gloriously billowing pillow of puffiness. Try that for a tongue twister!

Reading an article from The Independent, it would seem that the aroma of freshly-baked bread has even more than just the power to make your mouth water. According to a new study carried out by the University of Southern Brittany in France, it can also make you a kinder person! They found that shoppers were more likely to alert a random passerby that they had dropped a belonging if, at the time, they were also passing a bakery, filling the air with the sweet scent of fresh bread. Who would have thought that something as simple as the humble loaf would lead to a greater degree of altruism in strangers?

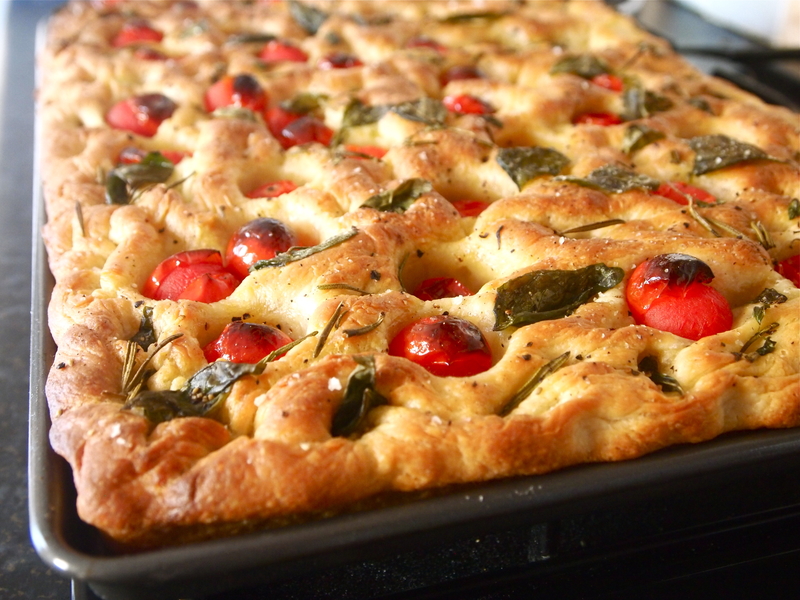
On a whole, I don’t actually buy a huge amount of bread, which is why I enjoy taking time out to make my own on days when there’s nowhere I’d rather be than in the kitchen. I quite relish time spent pottering about in my kitch! There’s also so many types of bread to choose from, but this time around I was in the mood for nothing other than a really tasty focaccia, laden with lots of good extra virgin olive oil, sweet cherry tomatoes, basil and rosemary.


Tomato, Basil & Rosemary Focaccia –

Adapted from ‘Jamie’s Kitchen’

(Make 2 big breads or one HUGE one!)

30g fresh yeast / 3 x 7g sachets or 21g dried yeast

30g honey or sugar

625ml / just over a pint of tepid water

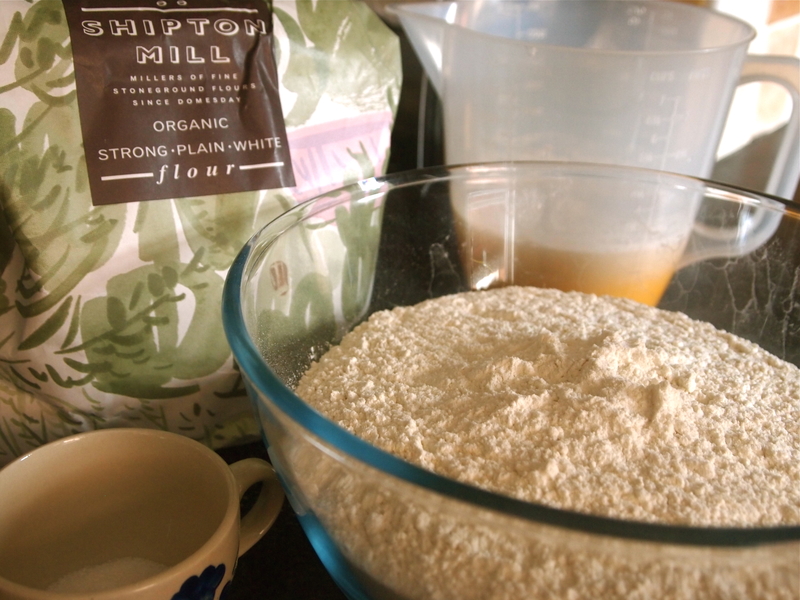
1kg / 2.2lb strong bread flour

30g maldon salt / 15g fine sea salt

Topping

500g / about 1lb flavourful cherry tomatoes

10 Tablespoons / 150ml extra vigin olive oil

a big handful of fresh basil leaves

a stalk of rosemary, leaves chopped

maldon salt & freshly ground black pepper

some extra flour for dusting

Method

Dissolve the yeast and honey or sugar in half of the tepid water.

Add the salt to the flour and tip onto a clean surface or into a large bowl. Make a well in the centre and pour in all the dissolved yeast mixture. With one of your hands, use a circular motion to combine the two, starting in the centre and moving outwards until all the liquid has been soaked up. Pour the other half of the tepid water into the centre and gradually incorporate all the flour to create a moist dough. (Certain flours may need a little more water depending on what brand you’re using, or even due to varying degrees of humidity in the atmosphere, so if you think it looks a bit too dry don’t be afraid to adjust the quantities! Trust your own judgement!)

Tomato and Herb Focaccia

Now it’s time to get kneading. My favourite! This is also a very important stage when making most types of yeasted breads, as it is this stretching and folding technique which develops the gluten and structure of the dough, giving it the desired lovely springy texture.

Firstly, dust the work surface with a little flour and begin pushing and folding the dough with the heel of your hand, maybe even giving it a slight turn every now again. You want to keep doing this for about 10 minutes until the dough feels nice and smooth. A telltale sign that you’ve kneaded enough is if you press your finger gently into the dough it should spring right back again.

Flour both of your hands and lightly flour the top of the dough as well. Make it into a roundish shape, place it on a large baking tray and make a deep score in it with a sharp knife. This will allow it to relax and prove with ease until it has doubled in size. Cover the dough loosely with clingfilm or plastic wrap and leave it for about 45 minutes, ideally in a warm, draught-free place.

Whilst it’s proving, put the cherry tomatoes into a bowl and cover with all of the olive oil.

Once your dough has proved and doubled in size, knock all the air out of it then put it onto a floured surface. At this point it’s up to you whether you want to make a really large focaccia or two smaller ones. I opted for one big one this time, but to be honest, unless you have a pretty huge baking tray I’d probably suggest making a couple of smaller ones. My baking tray just about fit into the oven and also just about held all the dough. Any smaller tray and you’re liable to have olive oil all over your oven! Definitely not a fun job to clean up after!

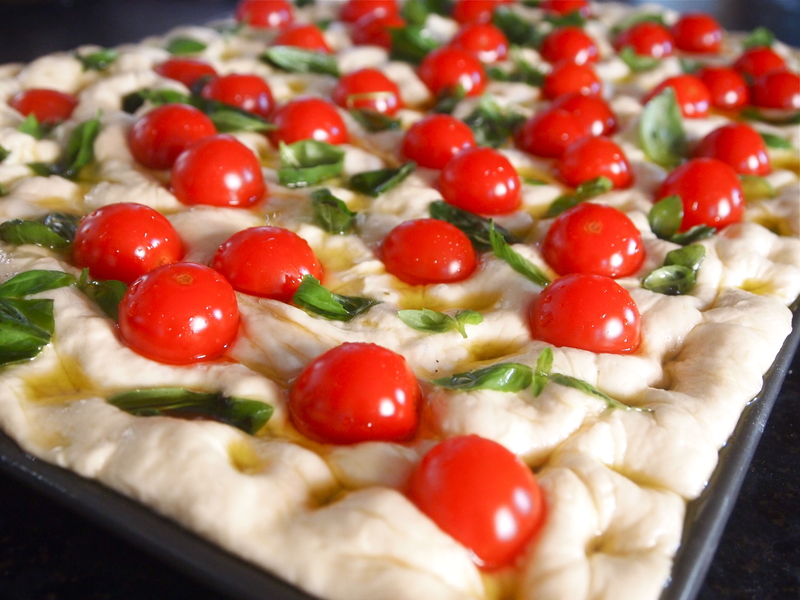
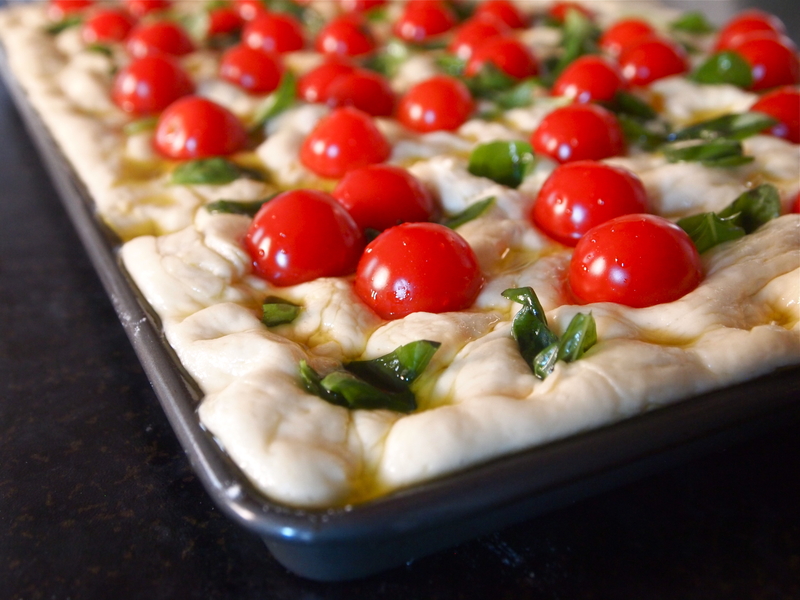
Flatten the dough out until it’s about 2.5cm / 1 inch thick and transfer it onto a floured baking tray. Push it right out to the corners so that it completely fills the tray. Pour over the tomatoes and all the olive oil, then sprinkle over the basil which you can tear up a little with your fingers as well as the chopped rosemary. Push your fingers through the dough, almost to the bottom of the tray, making indentations across the whole thing. The purpose of doing this is so that you get nice little pools of olive oil which the bread will soak up during cooking and, therefore, make it taste incredible. It also gives the focaccia it’s trademark dimpled good looks!

Tomato and Herb Focaccia

Tomato and Herb Focaccia

Leave to prove again for about half an hour or until it has doubled in size, then sprinkle it with the flaky maldon sea salt and black pepper.

Carefully place it into an oven preheated to 220°C/430°F for about 20-25 minutes, until the bread is crisp and golden on top and soft in the middle. Drizzle with a little more extra virgin olive oil once you take it out of the oven.

Tomato and Herb Focaccia

Focaccia is an indispensable bread to have in your repertoire because it lends itself so well to a myriad of different toppings. Use anything from olives, to anchovies, red onions, to garlic or deliciously sweet roasted peppers. Make whatever takes your fancy!

This recipe can be made vegan by simply using sugar instead of honey.

Nigel Slater made some good suggestions about what to pair with leftover focaccia in an article he wrote for The Observer:

“The next day, most hearth breads are still edible, but even the proudest home baker will concede they have lost their initial temptation. This is the point at which I split them through the middle, toast them lightly, and stuff them with whatever is appropriate or to hand. Cheeses, the more squidgy and milky the better; little hillocks of salad leaves; sun-dried tomatoes (for once in the right place); sexy spreads of crushed olives and anchovy; casual folds of parchment-fine ham; fat-bespeckled salami. A good lunch yesterday was a piece of taleggio and some mashed olives trapped between two slices of the day before’s bread, grilled not until the cheese was golden, but just until it starts to slide.

The bread’s last incarnation came this morning, torn into rough nuggets and dumped at the bottom of a couple of deep soup bowls. I covered it with a ladle or two of steaming chicken stock, a handful of shredded, blanched spring greens (so bright, so full of life) and a further trickle of olive oil. My bread was used down to the last juicy, salty crumb.”

Yes I know, there’s just so many options!

But if push comes to shove, I’ve got two words for you… sexy spreads.

There’s a hole in this cake

For anyone who’s familiar with the film ‘My Big Fat Greek Wedding’, I’m sure you’ll remember the scene when Toula’s love interest Ian brings his parents to meet the Portokalos family and Harriet Miller presents them with a bundt cake? Yes, you know the one! Maria Portokalos cannot, for the life of her, say the word ‘bundt’. “Bon? Bonk? BonnnT?” Oh, “It’s a cake!” Then, whilst walking back towards the house, she makes a disapproving comment about how this cake had a hole in it.

But, Alas! That is how it’s supposed to be! A bundt is in fact a cake with a hole in it, and that is why I love them. Why? Well, if your tins are anything like mine, they won’t have a gaping hole in the middle, but one that is sealed at the bottom. This serves the genius purpose of acting as a collecting vessel for excess glaze, thus more lemony bang for your buck! Perfect.

Lemon and Poppy seed is a combination I love, but don’t have often enough. I think it seems to be more of an American thing than British, but either way it tastes great. Some pairings are classics for a reason, they just work. Lemon and poppy seed are like the popular American kids of the baking realm, so best just stick them together in a crown shaped cake and pronounce them home-coming king and queen!

Bundt-01

Lemon Poppyseed Baby Bundts

(Makes 5)

125ml natural yoghurt

75g butter, melted

2 large eggs

zest of 1 lemon

150g plain flour

1/2 teaspoon bicarbonate of soda

125g caster sugar

1 tablespoon poppy seeds

pinch of salt

For the icing

200g icing sugar

juice of 1 lemon

Method

Preheat the oven to 170°C/gas mark 3.

Butter or oil generously 5 mini bundt tins (about 10cm diameter).

In a measuring jug, combine the yoghurt, melted butter, eggs and lemon zest.

Whisk together the flour, bicarbonate of soda, sugar, poppy seeds and salt.

Mix the wet ingredients into the dry, folding them well together, then fill the bundt tins about two-thirds full, and cook for about 25-30 minutes. When they come out of the oven, leave them to cool for a while before turning them out, otherwise they are prone to break up. However, don’t let them cool completely as they’ll just stick fast to the tin! Let them cool on a rack, flat-side down.

Making the lemon icing is incredibly quick and couldn’t be any easier. Just sieve the icing sugar into a bowl and whisk in enough lemon juice to make a smooth thick glaze, the snow atop your little lemony mountain peaks!

Bundt-02

Bundt-03

These bundt cakes are pretty versatile, so you can chop and change the flavour to what ever takes your fancy. I like the little pops of crunch and texture you get with the poppyseeds, but you could easily replace them with various dried fruits, chopped nuts or a good quality white chocolate. Orange zest would also make a lovely change to the lemon, in which case maybe something like dried cranberries or dark or milk chocolate would be a nice addition.

P.s. I  enjoy big bundts as much as the next girl, but after making these,

I like small bundts and I cannot lie.

– Over and out, Ms. Mix-a-Little.

Happy Mother’s Day

Shall I compare thee to a piece of cake?

Thou art more lovely and more elegant.

Rough oven fans do test the resilience of each bake.

And cakes expiration hath all too short a date.

…then Shakespeare gawked in awe and did the dougie.

Mother's Day 1

Mother's Day 2

Mums are just wonderful, and I would know since mine is the best in the world, but cake is a close second! This is why it is the perfect gift to give on Mother’s Day.

(As well as some bastardised Shakespeare of course, duh!)

The Glorious Galette

‘As easy as pie’. That has got to be one of the most misleading phrases in the world. Not that making a pie is difficult per se, but tender, flaky pastry does not come easily if the baker in question ain’t got skills. There’s the risk of a tough, over-worked crust or a soggy base if you’re not careful. If pie is so easy, then how come an amazing one is so hard to find? What is the solution?! I think somewhere along the line the French must have caught wind of this and created the galette; a free-form tart in which the pastry is simply rolled out and roughly folded around the edge of the filling. There we go, take away the formality of baking in a perfectly fluted pastry case and, BOOM.. easy. Facile as a french tart.

My first attempt at a galette was using quite an unusual fruit I spotted whilst doing my grocery shopping. The nectacot. Cross-pollination gives this little fruit the flavour of an apricot but with the juiciness of a nectarine, which as you can probably imagine tasted pretty good! After biting into this questionable specimen to deduce it’s calling in life, I decided that its sweet yet tart flavour and dense texture would lend perfectly to a simple fruit tart in which the fruit is the main attraction.

nectacots

Nectacot Galette (Serves 6-8)

For the flaky pastry

200g/6 1/2 oz plain flour (1 1/4 cups all-purpose)

1 Tablespoon caster sugar (superfine)

125g/4oz very cold butter, cut into 1/2 inch cubes

3 Tablespoons ice water, plus extra if needed

For the filling

125g/4oz (3/4 cup) ground almonds

60g/2oz (1/4 cup) caster sugar (superfine), plus 3 Tablespoons to sprinkle on before putting in the oven

finely grated zest of 1/4 lemon

1 large egg yolk

Roughly 600-700g (or 1.25 lb – 1.5 lbs) nectacots/nectarines, thinly sliced

15g (1 Tablespoon) butter, cut into small pieces

Method

To make the pastry: Measure the flour and sugar onto a large, flat work surface and spread out until about 1cm thick. Scatter the cubes of cold butter over the flour and toss a little flour over the butter so that your rolling pin doesn’t stick, and then get to rolling! Many pastry recipes call for the dough to be chilled before rolling, however this one benefits from being rolled out straight away.

butter & flour

When the butter starts flattening into long, thin sheets within the flour, use your hands or alternatively a bench scraper to bring in any remaining flour that has not yet been incorporated. Repeat the rolling and scraping 3 or 4 times before drizzling over the ice water. Mix with a fork until the dough is just about holding together and flatten into a disk.

Scrape your work surface clean and lightly dust with flour. Flatten the disk with 6-8 gentle taps of the rolling pin. Lift the dough and give it a quarter turn. Aim to handle the dough as little as possible as this will give you the flakiest crust! Continue to do this until you are left with a 30cm/12 inch circle. Place the dough onto a parchment lined baking sheet.

Dough

In a small bowl, stir together the ground almonds, the 60g caster sugar, lemon zest and egg yolk. Spread the mixture into a 20cm/8 inch circle in the centre of the dough.

Fan out the fruit over the almond mixture leaving a 4cm / 1.5 inch border of dough uncovered along the edge. Fold the edge of dough over the fruit, pleating it loosely and leaving the galette uncovered in the centre. Sprinkle the nectacots with the remaining 3 tablespoons of sugar and dot with the butter. Refrigerate the galette until the dough is firm, at least 30 minutes.

nectacot galette

galette

In the meantime, preheat the oven to 190°C/375°F. When out of the fridge, bake the galette for about 45-50 minutes until the crust is golden brown and the fruit tender.
Let cool for 20 minutes or so before serving.

I love this recipe for its simplicity and the fact that it is so versatile. The types of fruit you can use in this recipe is endless. Why don’t you try apples, pears, figs, plums or pineapple? Maybe even incorporate some dried fruit with the fresh. There are so many possibilities that I’m looking forward to trying out too. This rustic french tart with its deliciously flaky crust, vibrant crown of fruit and not to mention the moist almond interior is a dead cert winner.

galette