Thai Basil Chicken (Pad Kra Pao Gai)

So, it has been a strange old Summer hasn’t it? I’m back after a long hiatus, but felt there was really no better time than the present to share some nice dishes and document what I’ve been cooking up as of late.

At a time when everything feels so uncertain and up in the air, feeding and nourishing ourselves is so important. Also, the knowledge that there will be something delicious to look forward to at the end of the day is a real comfort and something I know I always look forward to. Even something very simple can be the most satiating. That is what has become hugely apparent to me during lockdown; simplicity, when it comes to food and many things for that matter, is so highly underrated.

There’s really a lot to be said for store cupboard cooking and the joys of creating something truely enjoyable with only a few ingredients. Many of my favourite meals over the past few months have been those which have come from the need to use up odds and ends in the fridge, all tied together with things I tend to always have in the cupboard. There’s nothing quite like resourcefulness to make a dish taste great! (You might think I’m joking here, but really though, when all those straggling leftovers turn into a surprising taste sensation and you’ve not only cleared room in your fridge but made a lightening-fast dinner that’s really hitting the spot? Well, I kind of feel like my stars have aligned!)

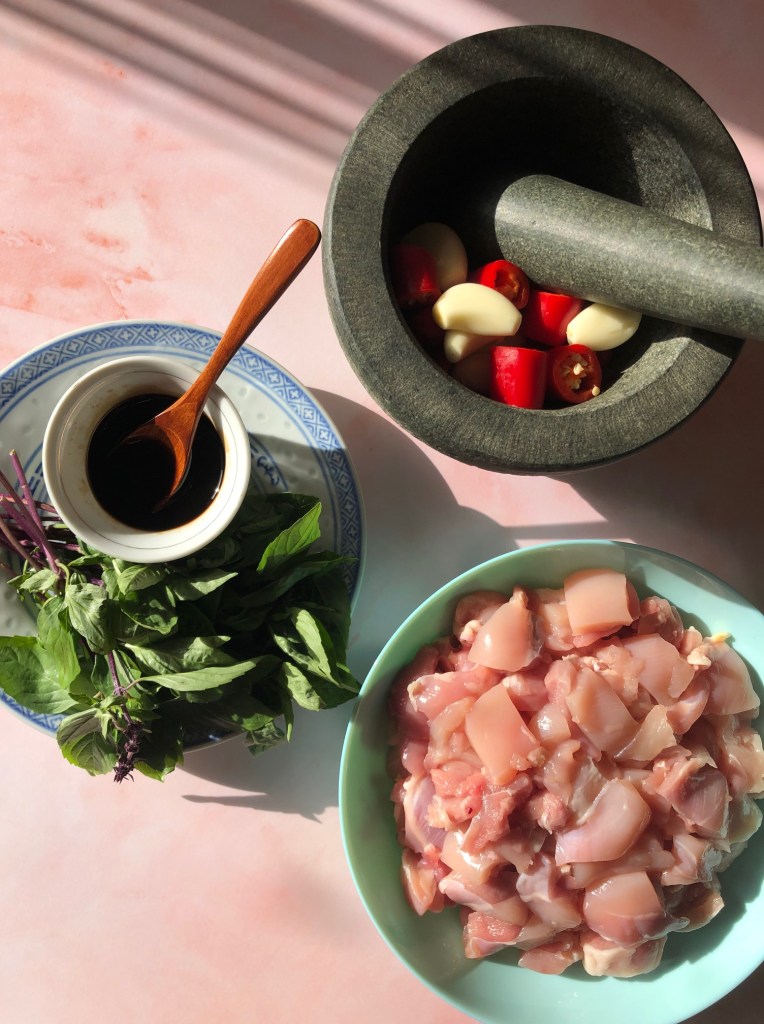
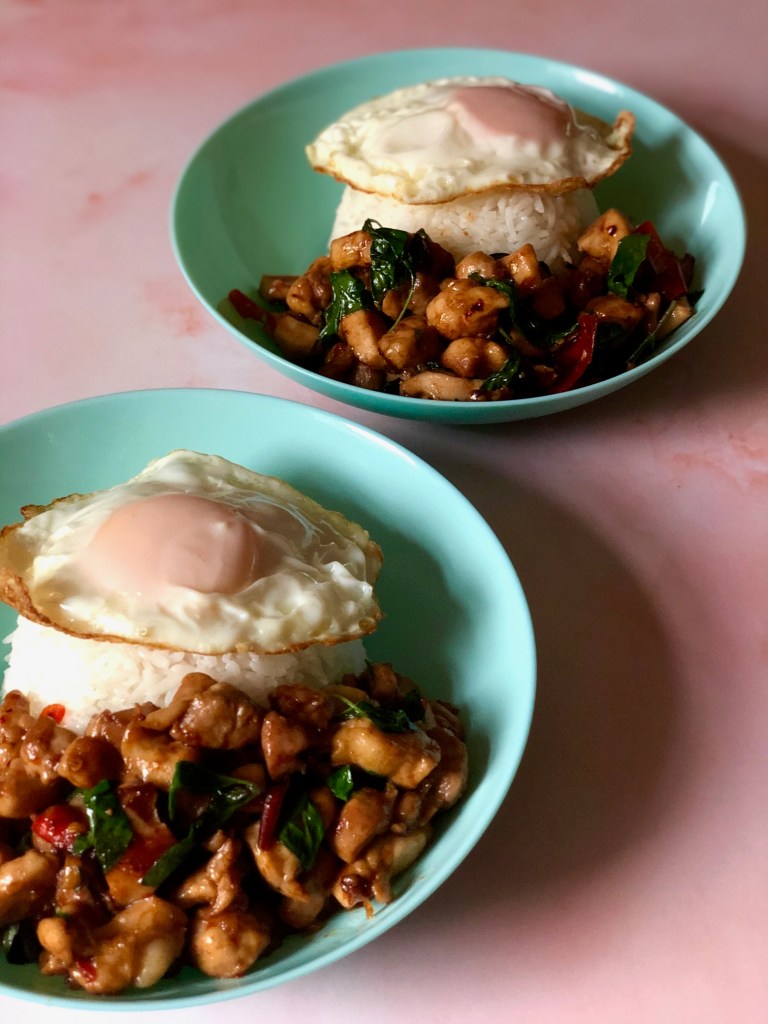
This simple Thai dish is real winner of a chicken dinner. I nearly always have some chicken in my fridge/freezer, chillies and garlic to hand, as well as staples like soya and oyster sauce, so if you’re the same, this can be whipped up at a moments notice. The Thai basil may be the only ingredient which can be harder to find, but these are unusual times, so just use what’s available to you whether that be regular basil or coriander. It won’t be quite the same of course, but I dare say it will still be delicious. As a matter of fact, holy basil is the variety you really want here for it’s full flavoured pepperiness, but any Thai basil is perfectly acceptable and that’s what I’ve used here.

* I doubled this recipe to serve two, but the ingredients I have listed will make one generous portion or 2 smaller portions. It is definitely better to stir-fry in smaller amounts if possible because the wok will stay nice and hot and cook much faster.

Ingredients

An egg, plus a couple of tbsp neutral oil for frying

2 or 3 skinless, boneless chicken thighs, diced into small pieces

5 garlic cloves, peeled

4-6 chillies, preferrably Thai chillies

1 tbsp neutral oil for frying

2 tsp oyster sauce

1 tsp light soya sauce

1/2 tsp dark soya sauce or kecap manis

1/2 tsp honey or sugar

A big handful of Thai basil, preferrably holy basil, leaves picked

Method

First things first, put on a pot of rice. You’ll be glad you did! Jasmine rice tastes particularly good with this.

Fry up an egg – Heat up a couple of tablespoons of oil in a wok or frying pan on medium-high heat. When the oil gets nice and hot crack in your egg, leaving it undisturbed so the bottom has a chance to get crispy. Take off the heat and finish it by spooning some of the hot oil from the pan over the top just enough to seal the yolk. Set this aside.

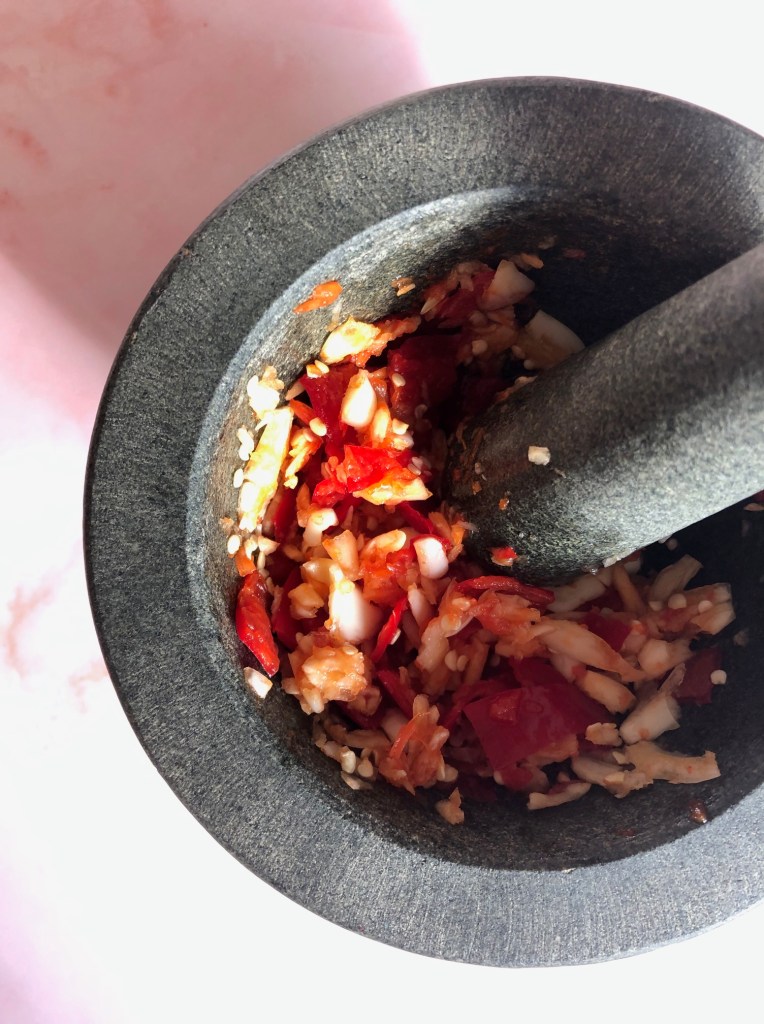
Next, the chicken – Pound the garlic and chillies together with a pestle and mortar. This just needs to be a rough paste, nothing too fine. You can coarsely chop these if you like, but pounding them helps to release a lot more of the oils and juices within the aromatics.

Mix up the oyster sauce, light & dark soya sauces and the honey/sugar, then set to the side.

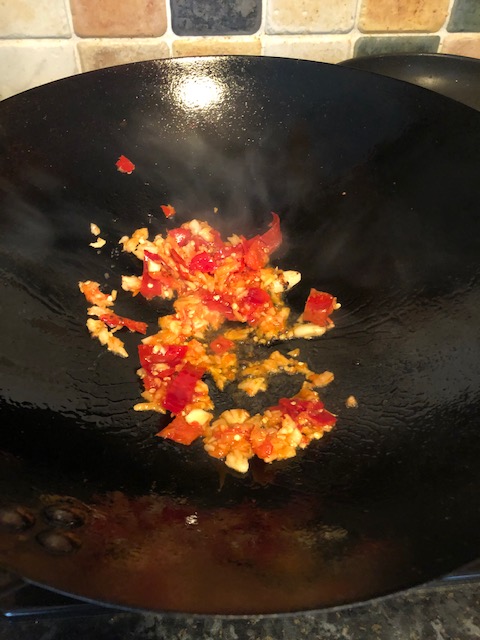
Heat your wok on a high heat, adding about a tbsp of oil. Once it gets hot, add in the chillies and garlic and stir-fry until it becomes fragrant, about 20 seconds; any longer and they might burn and become acrid.

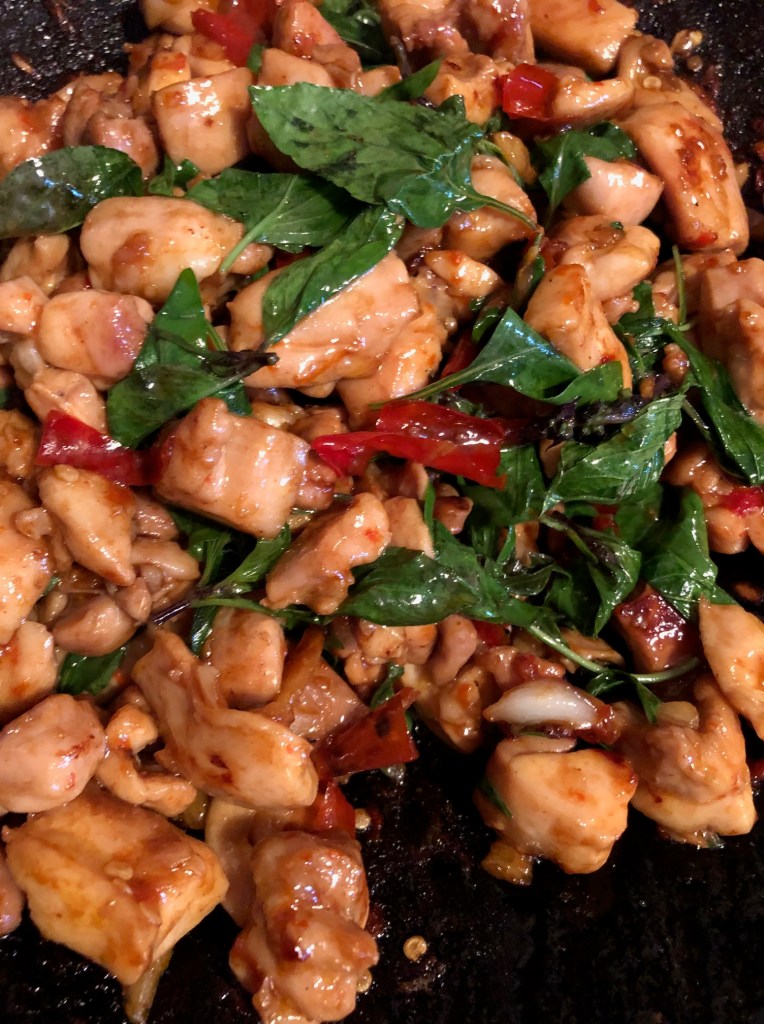
Add in the chicken and mix continuously for a few minutes until fully cooked and has a little colour. Next, add in your sauce and stir-fry for another 30 seconds or so. If it looks a little dry add a tiny splash of water.

(Bear in mind that quantities for the sauce are just a rough guide, so play with the ratio until it tastes just right for you!)

Lastly, put in a big handful of Thai basil leaves, take it off the heat and give it a good stir.

The residual heat will be perfect to wilt the basil just enough for it to retain all of it’s aromatic flavour and integrity.

Now just dish up a steaming bowl of rice and top it with the basil chicken and lacy, crisp fried egg. Hopefully you’ll be rewarded with an oozing, golden yolk to tie the whole thing together! And there you have one of Thailand’s most beloved street food dishes.

Humble in it’s simplicity, yet it’s vibrant flavour is anything but.

A Savoury Nibble

I often have a bit of a savoury tooth when it comes to snacking. I do love cake, my sweet sweet downfall, but when it comes to chocolate or biscuits and that sort of thing, I’d usually pass them up in a heartbeat for something saltier; a packet of crisps say, or some pitta chips with a tasty dip and a side of crunchy vegetables.

Lately I’ve spent a lot of my free time having a good drool over the food in the Honey & Co. cookbook. It all looks so delicious it’s hard to know where to start, but I noticed a recipe for Bouikos which they describe as little cheese buns native to the Balkans. To me, they taste like a really flaky savoury scone turned amuse bouche. On biting into one of these tantalising wee triangles my ‘bouche’ was certainly amused. Tender cheesy goodness, they really hit the spot!

Bouikos

Bouikos

100g plain flour

50g cold butter

40g mature cheddar cheese

40g feta

a pinch of salt

50ml sour cream

1/2 teaspoon nigella seeds

2 spring onions, sliced

milk, to glaze

Method

Cut the butter into small cubes, grate the cheddar cheese and crumble the feta, then combine all the ingredients together. Work the mixture together with your hands until it just combines. Lumps of butter and cheese are exactly what you want in this dough, because when you bake it they will melt and be so tasty!

Put the dough on a lightly floured work surface and pat it into a rough rectangle roughly 2-3cm thick. Flour the blade of your knife, cut the dough in half lengthways, slice across three times to divide it into six squares, then cut each of these corner to corner to make twelve small triangles. You could shape these into any shape you like though, however it might mean re-rolling the offcuts which has the potential of making them ever so slightly tougher.

Preheat your oven to 220°C/200°C fan/gas mark 7.

Brush the tops with a little milk for a glossy finish. Bake on a lined baking tray on the upper-middle shelf of the oven for 10 minutes. Open the oven and carefully turn the tray around, then reduce the temperature to 200°C/180°C fan/gas mark 6 and bake for a further 6-8 minutes until they are golden.

These can be eaten straight away or cooled on a tray until ready to be served. They do taste best though when eaten on the same day.

• What’s especially nice about this recipe is that it takes hardly any time to whip up, but they also freeze really well raw. Freeze the triangles on a flat tray with a bit of space in between each of them, then once they’re fully frozen pack them into a container or freezer bag. You could easily keep a ziplock bag of these in the freezer so they’re ready to just pop in the oven when snacks are called for, just make sure you let them thaw for a short while at room temperature before baking, between 30 minutes to an hour if possible. Now you have a nice nibble on backup for a rainy day! BOOM.

Warm Squash & Chickpea Salad with Tahini Lemon Dressing

This is the kind of food I often find myself craving. It’s so satisfyingly filling and perfectly savoury with a delicious sweetness from the goldenly roasted squash. Then you’ve got that rich, tart tahini and lemon dressing which makes the whole thing sing!

Warm Squash & Chickpea Salad with Tahini-Lemon Dressing – Serves 4

1kg butternut squash, peeled, de-seeded and chopped into 1 inch pieces

2 garlic cloves, crushed with a pinch of salt

1/2 teaspoon ground allspice

couple of tablespoons olive oil

400g tin or homecooked chickpeas

1/2 smal red onion, finely diced

handful of chopped coriander

For the dressing:

3 1/2 tablespoons lemon juice

3 tablespoons tahini paste

2 tablespoons water

2 tablespoons extra virgin olive oil

small squeeze of honey (optional)

Method

Heat the oven to 200°C.

Toss the squash with half of the garlic (the rest will be used in the dressing), the allspice, olive oil, salt and pepper. Place on a baking tray and put it into the oven for about half an hour or until tender.

While the squash is cooking get on with the tahini dressing. Mix the rest of the crushed garlic with the lemon juice and add in the tahini. Now thin it with the water and olive oil and add a little honey, salt and pepper to taste.

Assemble the salad by placing the squash, chickpeas, red onion and most of the coriander in a mixing bowl, then pour over the tahini dressing and toss together carefully. Sprinkle with the remaining coriander.

If you want to make this salad vegan, just omit the honey or substitute a different sweetener such as agave or even just a small pinch of sugar. It can even just be left out altogether with no problems.

Mushroom Orzo

I always find it quite satisfying when I come across something to make for dinner which is the perfect balance of delicious to low maintenance, something which doesn’t require a tonne of new ingredients. However I suppose the reason I feel this way is because I am not a stranger to taking a trip to the shops with a grocery list the length of my arm. Sometimes though, after a day in the kitchen at work, simple makes a refreshing change –  and this is a really lovely dish, not to mention the perfect way to use up the last of that bottle of wine sitting on the kitchen counter!

Orzo, or risoni as the Italians call it, is a small rice shaped pasta. Here, it is combined with some nice mushrooms and a lightly creamy sauce to make a really tasty, warming meal for two. I like to use a variety of mushrooms in this dish, the more flavoursome the better! I chose a mixture of chestnut and enoki’s this time around. If you do the same, I’d recommend frying the enoki’s separately as they take a little less time to cook.

Mushroom Orzo – serves 2

2 tablespoons rapeseed or olive oil

a knob of butter

500g mushrooms, cleaned and thickly sliced

150g orzo/risoni

2 garlic cloves, chopped

a few sprigs of thyme, leaves only

1 teaspoon balsamic vinegar

75 ml dry white wine

50ml crème fraîche

sea salt and freshly ground black pepper

a big handful of chopped flat-leaf parsley

Method

Put a large pot of well-salted water on to boil so that the orzo is ready to cook while the sauce is coming together.

Heat one tablespoon of the oil and half of the butter in a large frying pan over a medium high heat. Cook the mushrooms in two batches, using the remaining oil and butter for the second batch. You want to cook them until all the liquid that’s been released has evaporated and the mushrooms are starting to caramelise. When they’re almost cooked, put the orzo in the boiling water and cook until it tastes al dente.

Return the first batch of mushrooms back to the pan and add the garlic, thyme and vinegar. Give it a good stir and let it simmer for a minute or two before adding the wine. Cook for a few minutes until most of the liquid has evaporated, then add the crème fraîche, reducing the heat a little and stirring until it just starts to simmer. Season with salt and pepper.

Drain the pasta as soon as it’s cooked and add it to the mushroom mixture, tossing it together well.

Serve scattered with lots of chopped parsley.

It’s What’s Inside That Counts

Today I just wanted to share some lovely food photography with you all. It’s quite unusual and really rather wonderful too!

This collection of photographs come by way of New York based photographer Beth Galton, who has turned simple food items into incredibly striking conceptual art. In this ‘Cut Food Series’ she dishes up some fascinating images, allowing for a surprising glimpse of cross-sections of the food we eat.

The photographs I found particularly interesting were the ones of the liquids, especially the coffee. I love how dramatic the creamy swirls of milk look, appearing as though they’re loftily dancing about within the contrasting, deeply-hued cup of coffee. It’s quite odd knowing that they are in fact stationary though. I wonder how she got the liquid to set before the milk fully dispersed? Hmm, puzzling.

I_02-68_120328-Cut-Foods-37184

I_05-82-83_120328-Cut-Foods-36254_New

I_07-86_120328-Cut-Foods-36294

I_08-88-89_120328-Cut-Foods-36949

I_04-74_120328-Cut-Foods-36459

I_06-82_120328-Cut-Foods-36738

I_03-70-71_120328-Cut-Foods-36433

I_01-66-67_120328-Cut-Foods-36487

‘This series was inspired by an assignment in which we were asked to cut a burrito in half for a client. Normally for a job we photograph the surface of food, occasionally taking a bite or a piece out, but rarely the cross section of a finished dish. By cutting these items in half we move past the simple appetite appeal we normally try to achieve and explore the interior worlds of these products.’ Beth Galton

Glazed Pork. I repeat, Glazed. Pork.

I love it when you’re making dinner and happen upon something really special. I was in the mood for some good old comfort food, and being brought up on my mum’s delicious chinese cooking, for me that tends to veer towards the orient.

I started cooking with a rough idea in mind; Roast belly pork reminiscent of an asian barbeque. I commited to achieving this in every way possible except using a recipe. I spent hours in the kitchen simmering my little pot of homemade sauce and basting the life out of that lovely piece of meat. So, in other words I winged it, albeit wholeheartedly! Dedication is obviously the key though because it turned out better than I could have hoped!

What I managed to pull together after my kitchen foray into barbeque heaven was this:

Glazed Pork

Unctuously glazed belly pork cooked in a deliciously addictive sticky sauce, topped with spring onion. The nice balance of chilli heat, sweetness, saltiness and acidity gave it a predominantly umami flavour – guaranteed to make you weak in the knees! As with asian food in general, it’s all about getting that balance. I served it with some spicy pickled cucumber, roasted peanuts, a little red pepper and corn salad and of course, some fluffy steamed rice.

I may try this out again sometime soon and jot down some notes as I go along, because this is definitely a recipe worth remembering.

Super Tuber!

Last week I tried my very first Japanese sweet potato, known in Japan as Satsuma-imo. I’m already a big fan of the standard orange fleshed variety, but I was fancying something a little different so I thought I’d give these ones a shot. Aesthetically they look lovely! The skin is a nice vibrant reddish colour with slight traces of purple and they have a creamy white interior. I wanted to cook them very simply this time so their true flavour would shine through without any distractions.

Japanese Sweet Potato

All I did with these little babies was preheat the oven to 180°C, wash and dry them, then loosely wrap up each potato with a small splash of oil in some tin foil. You can also add a pinch of salt if you feel that way inclined, or just leave them as is like I did. Make sure you scrunch the seam of the foil up nice and tight though so none of the moisture escapes. This moisture helps steam the potato cooked, but because it’s being baked in the oven the base gets a little bit crisp and chewy! The best bit!

Japanese Sweet Potato

Put your litte foil parcels on a baking tray and bake them for around 45 minutes to an hour. The cooking time will vary a bit depending on the size of the sweet potatoes and how hot your oven gets, but just check by piercing them with a knife and if they seem soft and the knife goes in with very little resistance then they’re done!

Japanese Sweet Potato

The first one I had I ate completely plain so I could appreciate the flavour for what it was, and it is by all means a natural beauty! It was lovely and sweet and had a slightly drier texture to the usual orange fleshed kind. Not in a bad way though. It actually made it taste reminiscent of chestnuts, which I love, so that was a very nice surprise! No. 2 was enjoyed with a slick of butter and salt and pepper! Both tasted good in different ways. I’m pretty sure Satsuma-imo connoisseurs in Japan who buy theirs fresh from the market, plucked straight from their garden or from street vendors who cook then bury them in gravel to retain their moisture, would consider putting anything on top of these beauties sacrilege! I do agree though, they don’t really need anything, except maybe a glass of milk to drink alongside which I hear is traditional? I never thought Japan, or any Asian country for that matter, was a country of milk drinkers. I digress. As I was saying, they taste amazing all on their own. If it went on the X-Factor, it would be one of those contestants that are just naturally really good and unassuming – no gimmicks, flashy lights or manic cheesy backing dancers necessary. Let’s face it though, it would get kicked out. The best ones always do.

So, maybe I’m just going through a phase, but these tasted like the best sweet potatoes I’ve ever had. I’ll definitely be picking up some more next time I see them.

Japanese Sweet Potato

Japanese Sweet Potato

• I used a nice cold pressed Irish rapeseed oil that’s produced by Derrycamma Farm in Co. Louth to drizzle on top before baking. It has a subtle nutty flavour that I really like, but it is quite mild so use whatever you have at hand, whether it be olive, groundnut or sunflower oil, they’ll all work just as well!

Focaccia self on and make some bread

There are very few smells I can think of that can compete with the wonderful aroma of freshly baked bread. It’s nice how something so simple, which uses only a few basic ingredients, can produce one of life’s greatest comfort foods and make a house feel so homely. I find it to be a very satisfying thing to make and really enjoy each stage of the process, from the therapeutic kneading of the dough to seeing it rise into a gloriously billowing pillow of puffiness. Try that for a tongue twister!

Reading an article from The Independent, it would seem that the aroma of freshly-baked bread has even more than just the power to make your mouth water. According to a new study carried out by the University of Southern Brittany in France, it can also make you a kinder person! They found that shoppers were more likely to alert a random passerby that they had dropped a belonging if, at the time, they were also passing a bakery, filling the air with the sweet scent of fresh bread. Who would have thought that something as simple as the humble loaf would lead to a greater degree of altruism in strangers?

On a whole, I don’t actually buy a huge amount of bread, which is why I enjoy taking time out to make my own on days when there’s nowhere I’d rather be than in the kitchen. I quite relish time spent pottering about in my kitch! There’s also so many types of bread to choose from, but this time around I was in the mood for nothing other than a really tasty focaccia, laden with lots of good extra virgin olive oil, sweet cherry tomatoes, basil and rosemary.


Tomato, Basil & Rosemary Focaccia –

Adapted from ‘Jamie’s Kitchen’

(Make 2 big breads or one HUGE one!)

30g fresh yeast / 3 x 7g sachets or 21g dried yeast

30g honey or sugar

625ml / just over a pint of tepid water

1kg / 2.2lb strong bread flour

30g maldon salt / 15g fine sea salt

Topping

500g / about 1lb flavourful cherry tomatoes

10 Tablespoons / 150ml extra vigin olive oil

a big handful of fresh basil leaves

a stalk of rosemary, leaves chopped

maldon salt & freshly ground black pepper

some extra flour for dusting

Method

Dissolve the yeast and honey or sugar in half of the tepid water.

Add the salt to the flour and tip onto a clean surface or into a large bowl. Make a well in the centre and pour in all the dissolved yeast mixture. With one of your hands, use a circular motion to combine the two, starting in the centre and moving outwards until all the liquid has been soaked up. Pour the other half of the tepid water into the centre and gradually incorporate all the flour to create a moist dough. (Certain flours may need a little more water depending on what brand you’re using, or even due to varying degrees of humidity in the atmosphere, so if you think it looks a bit too dry don’t be afraid to adjust the quantities! Trust your own judgement!)

Tomato and Herb Focaccia

Now it’s time to get kneading. My favourite! This is also a very important stage when making most types of yeasted breads, as it is this stretching and folding technique which develops the gluten and structure of the dough, giving it the desired lovely springy texture.

Firstly, dust the work surface with a little flour and begin pushing and folding the dough with the heel of your hand, maybe even giving it a slight turn every now again. You want to keep doing this for about 10 minutes until the dough feels nice and smooth. A telltale sign that you’ve kneaded enough is if you press your finger gently into the dough it should spring right back again.

Flour both of your hands and lightly flour the top of the dough as well. Make it into a roundish shape, place it on a large baking tray and make a deep score in it with a sharp knife. This will allow it to relax and prove with ease until it has doubled in size. Cover the dough loosely with clingfilm or plastic wrap and leave it for about 45 minutes, ideally in a warm, draught-free place.

Whilst it’s proving, put the cherry tomatoes into a bowl and cover with all of the olive oil.

Once your dough has proved and doubled in size, knock all the air out of it then put it onto a floured surface. At this point it’s up to you whether you want to make a really large focaccia or two smaller ones. I opted for one big one this time, but to be honest, unless you have a pretty huge baking tray I’d probably suggest making a couple of smaller ones. My baking tray just about fit into the oven and also just about held all the dough. Any smaller tray and you’re liable to have olive oil all over your oven! Definitely not a fun job to clean up after!

Flatten the dough out until it’s about 2.5cm / 1 inch thick and transfer it onto a floured baking tray. Push it right out to the corners so that it completely fills the tray. Pour over the tomatoes and all the olive oil, then sprinkle over the basil which you can tear up a little with your fingers as well as the chopped rosemary. Push your fingers through the dough, almost to the bottom of the tray, making indentations across the whole thing. The purpose of doing this is so that you get nice little pools of olive oil which the bread will soak up during cooking and, therefore, make it taste incredible. It also gives the focaccia it’s trademark dimpled good looks!

Tomato and Herb Focaccia

Tomato and Herb Focaccia

Leave to prove again for about half an hour or until it has doubled in size, then sprinkle it with the flaky maldon sea salt and black pepper.

Carefully place it into an oven preheated to 220°C/430°F for about 20-25 minutes, until the bread is crisp and golden on top and soft in the middle. Drizzle with a little more extra virgin olive oil once you take it out of the oven.

Tomato and Herb Focaccia

Focaccia is an indispensable bread to have in your repertoire because it lends itself so well to a myriad of different toppings. Use anything from olives, to anchovies, red onions, to garlic or deliciously sweet roasted peppers. Make whatever takes your fancy!

This recipe can be made vegan by simply using sugar instead of honey.

Nigel Slater made some good suggestions about what to pair with leftover focaccia in an article he wrote for The Observer:

“The next day, most hearth breads are still edible, but even the proudest home baker will concede they have lost their initial temptation. This is the point at which I split them through the middle, toast them lightly, and stuff them with whatever is appropriate or to hand. Cheeses, the more squidgy and milky the better; little hillocks of salad leaves; sun-dried tomatoes (for once in the right place); sexy spreads of crushed olives and anchovy; casual folds of parchment-fine ham; fat-bespeckled salami. A good lunch yesterday was a piece of taleggio and some mashed olives trapped between two slices of the day before’s bread, grilled not until the cheese was golden, but just until it starts to slide.

The bread’s last incarnation came this morning, torn into rough nuggets and dumped at the bottom of a couple of deep soup bowls. I covered it with a ladle or two of steaming chicken stock, a handful of shredded, blanched spring greens (so bright, so full of life) and a further trickle of olive oil. My bread was used down to the last juicy, salty crumb.”

Yes I know, there’s just so many options!

But if push comes to shove, I’ve got two words for you… sexy spreads.

Too Hot? Too Spicy? Hot Hot!

It’s no secret that I am a big chilli fan. Sometimes I have to stop myself from putting it in just about everything! There’s just something about the fresh flavour they impart as well as their varying degrees of tongue numbingness that I love and cannot seem to get enough of. And they’re SO versatile. Chilli and chocolate anyone? They are a match made in heaven. After two and a half years of my cooking, Martina has gained quite the chilli tolerance too and can take it like a pro. I feel so proud! Or should I say, after two and a half years of subtly upping the quantity of spice she has not yet noticed! Scooore! I think that is a job well done. Little does she know I’m priming her for a really insane, Man v Food style chilli eating contest! Mwahahaa!*

Chillies come in so many different forms and can be used in a multitude of ways. The ones that are in constant rotation in my kitchen are fresh red and green chillies, dried chillies, Kashmiri chilli powder, the Malaysian sambal oelek, shichimi (Japanese 7 spice powder) Sriracha hot sauce (the Hollywood A-lister of the condiment world, created by Chinese-Vietnamese founder David Tran), a crispy chilli in chilli oil that has fried shallots in it and a photography of a very serious looking Chinese lady on the front and most recently gochujang, a fermented Korean condiment made from red chillies, glutinous rice, fermented soya beans and salt. It would seem I have the bulk of Asia covered! And they’re all fantastic in their own unique way. Oh, and those pickled green chillies you sometimes get on the side when you order falafel? Uhh yes please! Who could refuse that tangy, spicy kick in the tastebuds?!

I do realise that not everyone’s such a huge fan though and people are often told to stay away from spicy foods when they’re feeling unwell. I don’t know about you, but sometimes when I am sick that’s what I find myself craving, especially when I have a cold or I’m feeling congested. At times like this I imagine something hot and fresh, like Tom yam soup, will cut through the sick feeling and come out triumphant! (or at least shoo it away a little faster.) It may not be the best thing to have if you have a stomach bug, but according to Wikipedia, the online fountain of knowledge, chillies are a safe and effective way in relieving arthritis pain, shingles, diabetic neuropathy and headaches. Not that I needed convincing, but anyways, I’m sold!

With the amount of chillies that I use in my cooking, I thought it was about time I grew my own. My sister Rachel bought me a nifty little grow your own tin, well, ages ago (sorry Rachie!) that I had yet to use, so yesterday I cracked it out to hopefully send myself on my way to chilli nirvana!

Here look, isn’t it cute? I can’t wait to see all those little Italian chillies start to flourish!

Chillies in a tin

According to psychologist Paul Rozen, eating chillies is a prime example of a “constrained risk”, like riding a roller coaster, so people can enjoy the feelings of pain and fear because they know that these sensations are not actually harmful. This method lets people experience extreme feelings without any risk of bodily harm.

That says it all: If eating chillies is being compared to riding roller coasters, they must be pretty damn amazing.

* And no, I am not ACTUALLY entering Martina into a chilli eating contest. The idea is to help increase tolerance, not annihilate her poor little tastebuds!