Warm Squash & Chickpea Salad with Tahini Lemon Dressing

This is the kind of food I often find myself craving. It’s so satisfyingly filling and perfectly savoury with a delicious sweetness from the goldenly roasted squash. Then you’ve got that rich, tart tahini and lemon dressing which makes the whole thing sing!

Warm Squash & Chickpea Salad with Tahini-Lemon Dressing – Serves 4

1kg butternut squash, peeled, de-seeded and chopped into 1 inch pieces

2 garlic cloves, crushed with a pinch of salt

1/2 teaspoon ground allspice

couple of tablespoons olive oil

400g tin or homecooked chickpeas

1/2 smal red onion, finely diced

handful of chopped coriander

For the dressing:

3 1/2 tablespoons lemon juice

3 tablespoons tahini paste

2 tablespoons water

2 tablespoons extra virgin olive oil

small squeeze of honey (optional)

Method

Heat the oven to 200°C.

Toss the squash with half of the garlic (the rest will be used in the dressing), the allspice, olive oil, salt and pepper. Place on a baking tray and put it into the oven for about half an hour or until tender.

While the squash is cooking get on with the tahini dressing. Mix the rest of the crushed garlic with the lemon juice and add in the tahini. Now thin it with the water and olive oil and add a little honey, salt and pepper to taste.

Assemble the salad by placing the squash, chickpeas, red onion and most of the coriander in a mixing bowl, then pour over the tahini dressing and toss together carefully. Sprinkle with the remaining coriander.

If you want to make this salad vegan, just omit the honey or substitute a different sweetener such as agave or even just a small pinch of sugar. It can even just be left out altogether with no problems.

Mushroom Orzo

I always find it quite satisfying when I come across something to make for dinner which is the perfect balance of delicious to low maintenance, something which doesn’t require a tonne of new ingredients. However I suppose the reason I feel this way is because I am not a stranger to taking a trip to the shops with a grocery list the length of my arm. Sometimes though, after a day in the kitchen at work, simple makes a refreshing change –  and this is a really lovely dish, not to mention the perfect way to use up the last of that bottle of wine sitting on the kitchen counter!

Orzo, or risoni as the Italians call it, is a small rice shaped pasta. Here, it is combined with some nice mushrooms and a lightly creamy sauce to make a really tasty, warming meal for two. I like to use a variety of mushrooms in this dish, the more flavoursome the better! I chose a mixture of chestnut and enoki’s this time around. If you do the same, I’d recommend frying the enoki’s separately as they take a little less time to cook.

Mushroom Orzo – serves 2

2 tablespoons rapeseed or olive oil

a knob of butter

500g mushrooms, cleaned and thickly sliced

150g orzo/risoni

2 garlic cloves, chopped

a few sprigs of thyme, leaves only

1 teaspoon balsamic vinegar

75 ml dry white wine

50ml crème fraîche

sea salt and freshly ground black pepper

a big handful of chopped flat-leaf parsley

Method

Put a large pot of well-salted water on to boil so that the orzo is ready to cook while the sauce is coming together.

Heat one tablespoon of the oil and half of the butter in a large frying pan over a medium high heat. Cook the mushrooms in two batches, using the remaining oil and butter for the second batch. You want to cook them until all the liquid that’s been released has evaporated and the mushrooms are starting to caramelise. When they’re almost cooked, put the orzo in the boiling water and cook until it tastes al dente.

Return the first batch of mushrooms back to the pan and add the garlic, thyme and vinegar. Give it a good stir and let it simmer for a minute or two before adding the wine. Cook for a few minutes until most of the liquid has evaporated, then add the crème fraîche, reducing the heat a little and stirring until it just starts to simmer. Season with salt and pepper.

Drain the pasta as soon as it’s cooked and add it to the mushroom mixture, tossing it together well.

Serve scattered with lots of chopped parsley.

Back To Porridge

Porridge, when made the right way, is a lovely thing indeed. It’s perfect for those days when all you want for breakfast is something warm and comforting, containing only a few simple ingredients.

This past week I’ve been all about the porridge. I’ve been having it every single morning. I caught myself thinking about it late one evening and was wondering about the pre-soaking stage some people do before actually cooking it. I know it’s traditional and all, but does it really make much of a difference? For the amount of effort which actually goes into it, I thought I’d give it a go. From boiling the kettle it literally took me all of 20 seconds, and you know, I think I’m a convert. This extra little step really helps in softening the oats so that when they’re cooked the overall texture is nice and creamy.

It seems almost funny giving you a recipe for porridge because it’s one of those things that epitomises the word ‘basic’. People don’t tend to get over-excited about it. I really like it though. And that term ‘Back to Porridge’? Come on, what is that all about? Don’t say it like it’s a bad thing! I may have to reinvent the phrase and just start using it more positively. “What time is it?! Morning?? Oooh! Back to porridge!”

I think the trick to making a really tasty porridge is all in the amount of time it cooks for. Soaking the oats overnight does cut back on the cooking time a little, but even so, I still like to simmer it for a good 20 minutes or so. This recipe is so easy it almost isn’t one and takes very little effort on your part, so get it in your repertoire!

The Perfect Bowl of Porridge – Serves 1 very hungry individual

1/2 cup organic rolled oats

1 cup freshly boiled water

1/2 cup milk

a pinch of sea salt

Method

Put the oats in a saucepan and add the hot water and pinch of salt. Give it a stir, then cover with a tea towel overnight.

Organic Rolled OatsOrganic Rolled OatsPorridgePorridgePorridge

The following morning, add the milk to the soaked oats and simmer for about 20 minutes on the lowest heat possible. Add a little extra milk if it gets too thick or dry.

PorridgeOLYMPUS DIGITAL CAMERA

After simmering, your porridge should have thickened to a nice creamy consistency. Now get it into a bowl because it’s almost ready to eat!

Porridge

I usually eat mine with a squeeze of honey or maple syrup, but this week I’ve reverted back to my childhood and have been really enjoying it with a bit of soft brown demerara sugar and a splash of milk. That is where it’s at.

PorridgePorridge

If you forget to soak the oats the night before it’s not the end of the world! Just soak them for about 15 or 20 minutes prior to cooking, then simmer for about half an hour adding a little extra milk if necessary.

For this recipe I specify a half cup measure of oats, an American measurement which holds 125ml, but really any small mug will do.

Porridge is great eaten with so many different toppings: Maple syrup, honey, or agave nectar. Whatever nuts and seeds you happen to like. Try it with some dried fruit, like raisins or sultanas, figs, sour cherries or dates, or fresh fruit like sliced juicy pears, peaches or nectarines. Another good combo you should try is banana and peanut butter – Just stir in a spoonful of peanut butter into the porridge towards the end of the cooking time along with some sliced banana. When the banana is stirred into the hot porridge it gets a little cooked and becomes reminiscent of the inside of a banana fritter… Yeeaahh that’s right! If that, for some reason unknown to me, is not your thing, just slice some over the top once it’s in the bowl. Whichever topping you decide to opt for, it will taste great, and if not, I will eat my hat, so pick a good’un because I don’t really want to, okay? Thanks.

Hummus be kidding me!

Hummus. That simple dish of chickpeas blended with a little tahini, lemon juice, garlic and salt, that somehow manages to have the allure of something much grander. The debate over hummus is ongoing, from where in the Middle East it originated to how it should be prepared and eaten. Chunky or smooth? Warm or room temperature? Blended with or without olive oil? Served as is or with a topping?

And so the list goes on.

I would like to stop for a second and take a breath from the many variations out there, and give you a simple recipe for the hummus I made for lunch today. This came about from not knowing what to make, and after a quick brain rumage of what was in the cupboard I decided I needed to get my hummus on! I realise from past experiences that hummus can be really expensive depending on where you buy it from. Criminal, since it’s generally a very cost efficient thing to make. Since it came to me as a bit of a last minute idea, I made it with a tin of chickpeas instead of going through the whole dried chickpea soaking process. This made it incredibly fast to whip up and took very little work on my part. What I did do, however, was pinch those bad boys out of their little white jackets. I felt in the mood for a nice smooth dip today, so the skins were happily discarded! This is the first time I’ve ever been so precious over a bowl of hummus, but I must say, it was definitely worth the extra smidge of effort and it really didn’t take much time at all. Either way, consider it a labour of love! The silky smoothness was a lovely change from the coarser stuff I’ve become accustomed to, so give it a go and see which way you prefer!

Hummus

Hummus & Pitta Chips

1 tin of chickpeas, skins removed

80 mls (1/3 cup) tahini (sesame paste)

juice of half a lemon, or to taste

1 garlic clove, crushed

salt, to taste

approximately 60 ml (1/4 cup or 4 Tbsp) very cold water

A generous slosh of extra vigin olive oil

1 small tomato (optional)

A sprig of fresh thyme (optional)

A sprinkling of sumac (optional)

A few pitta breads

Method

Place the chickpeas into the bowl of a food processor, reserving a small handful for sprinkling over at the end, and blend to a stiff paste. With the machine still running, add the tahini, lemon juice, garlic and a generous pinch of salt. Add the water in a slow, steady stream, blending until you have a very smooth and creamy paste. Cover the surface with clingfilm and leave to rest for about 30 minutes.

In the meantime, preheat the oven to 200 C.

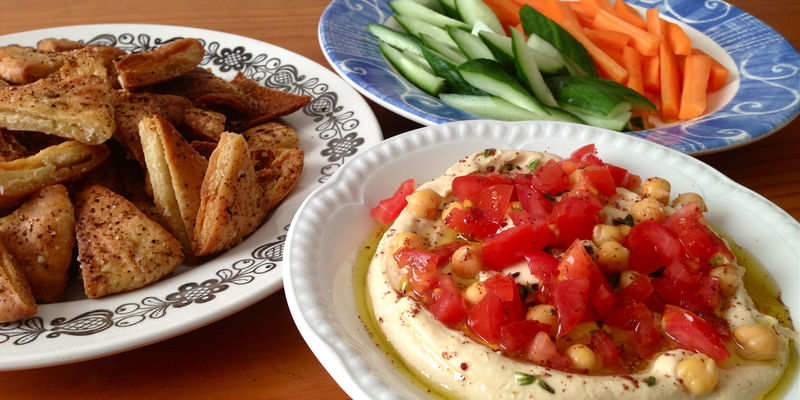
Cut the pitta bread in half, then into wedges. Put them on a baking tray and coat generously in olive oil, salt, pepper and any other spices you might want. I put cumin seeds on mine, as well as a some Japanese shichimi for a slight kick of heat. Put them in the oven for about 15-20 minutes, or until golden brown.

Top the hummus with a healthy dose of extra vigin olive oil, the remaining chickpeas, some fresh thyme leaves and a small tomato chopped up. Sprinkle with a pinch of salt and some deliciously tangy sumac if you have it.

Now, go and have a tasty lunch and enjoy!

• Hummus is such a super food. A ‘superfood’ in the health kick sense of the word, yes, but really, even more literal than that. It is a super. food. SUPER! I kid you not. It’s cheap and cheerful, tastes wonderful, is satisfyingly filling, healthy and a snap to make. Try to use nice large, soft chickpeas for this. After years of trying different brands from various places, I’ve come to the conclusion that ones you get in Asian supermarkets tend to be vastly superior. Don’t get me wrong, they cost very little, actually probably much less than those from the major supermarkets but the difference in texture is phenominal. Deliciously soft and yielding as opposed to small, hard pellets that are not a pleasure to eat at all! What is that all about?!

Also, bear in mind that these toppings are completely optional. It will still be really tasty with nothing but a splash of olive oil on top! I like to serve some raw veggies on the side too, such as nice fresh carrot sticks or pieces of cucumber with the seeds removed to dip into the remaining hummus.

I remember a couple of years ago reading a wonderful article Yotam Ottolenghi wrote for The Guardian’s Word of Mouth blog called ‘The Perfect Hummus Debate‘, where he goes into more detail about this little wonder of the culinary world! If you’re interested in a little extra light reading, this is well worth a look at. Especially if you want a lovely recipe for hummus with ful, and who in their right mind wouldn’t?!

There’s a hole in this cake

For anyone who’s familiar with the film ‘My Big Fat Greek Wedding’, I’m sure you’ll remember the scene when Toula’s love interest Ian brings his parents to meet the Portokalos family and Harriet Miller presents them with a bundt cake? Yes, you know the one! Maria Portokalos cannot, for the life of her, say the word ‘bundt’. “Bon? Bonk? BonnnT?” Oh, “It’s a cake!” Then, whilst walking back towards the house, she makes a disapproving comment about how this cake had a hole in it.

But, Alas! That is how it’s supposed to be! A bundt is in fact a cake with a hole in it, and that is why I love them. Why? Well, if your tins are anything like mine, they won’t have a gaping hole in the middle, but one that is sealed at the bottom. This serves the genius purpose of acting as a collecting vessel for excess glaze, thus more lemony bang for your buck! Perfect.

Lemon and Poppy seed is a combination I love, but don’t have often enough. I think it seems to be more of an American thing than British, but either way it tastes great. Some pairings are classics for a reason, they just work. Lemon and poppy seed are like the popular American kids of the baking realm, so best just stick them together in a crown shaped cake and pronounce them home-coming king and queen!

Bundt-01

Lemon Poppyseed Baby Bundts

(Makes 5)

125ml natural yoghurt

75g butter, melted

2 large eggs

zest of 1 lemon

150g plain flour

1/2 teaspoon bicarbonate of soda

125g caster sugar

1 tablespoon poppy seeds

pinch of salt

For the icing

200g icing sugar

juice of 1 lemon

Method

Preheat the oven to 170°C/gas mark 3.

Butter or oil generously 5 mini bundt tins (about 10cm diameter).

In a measuring jug, combine the yoghurt, melted butter, eggs and lemon zest.

Whisk together the flour, bicarbonate of soda, sugar, poppy seeds and salt.

Mix the wet ingredients into the dry, folding them well together, then fill the bundt tins about two-thirds full, and cook for about 25-30 minutes. When they come out of the oven, leave them to cool for a while before turning them out, otherwise they are prone to break up. However, don’t let them cool completely as they’ll just stick fast to the tin! Let them cool on a rack, flat-side down.

Making the lemon icing is incredibly quick and couldn’t be any easier. Just sieve the icing sugar into a bowl and whisk in enough lemon juice to make a smooth thick glaze, the snow atop your little lemony mountain peaks!

Bundt-02

Bundt-03

These bundt cakes are pretty versatile, so you can chop and change the flavour to what ever takes your fancy. I like the little pops of crunch and texture you get with the poppyseeds, but you could easily replace them with various dried fruits, chopped nuts or a good quality white chocolate. Orange zest would also make a lovely change to the lemon, in which case maybe something like dried cranberries or dark or milk chocolate would be a nice addition.

P.s. I  enjoy big bundts as much as the next girl, but after making these,

I like small bundts and I cannot lie.

– Over and out, Ms. Mix-a-Little.

I don’t think you’re ready for this belly

‘Cause this belly’s just too delicious for ya babe.

This is one cut of meat that really can’t do any wrong. Firstly, it’s incredibly economical. Why? Because it’s kind of fatty. But that’s okay since it’s the fat that keeps the meat so meltingly tender when cooked low and slow, and that is what we want! Besides you’re not under any obligation to eat the fat if you don’t want to. No contract to sign here. Let it do it’s thing in the oven, then send it packing and what you will be left with is a mountain of tender, juicy meat. Another perk of belly pork is that it also comes fully equipped with an earth shatteringly crunchy layer of crackling if cooked correctly, but that’s pretty easy to accomplish and I’ll show you how.

Slow Roasted Pork Belly with Fennel & Coriander Seed Crackling

(Serves 4-6, depending on the size of your piece of pork)

3 teaspoons (1 Tablespoon) coriander seeds

2 teaspoons fennel seeds

1 nice thick piece of pork belly, skin scored

Sea salt & freshly ground black pepper

Method

Preheat your oven to 220°C/Gas Mark 7.

Put the coriander and fennel seeds into a mortar and grind together with the pestle until crushed. It doesn’t have to be ground to a very fine powder though, just pound it enough to release the nice aromas from the spices.

Belly Pork 1

If you haven’t already had the meat scored by your butcher you can do it easily yourself so long as you have a very sharp knife. Stanley knives work well here, but just be careful not to cut through the meat itself. The aim is to make long cuts only through the skin as this helps with the crackling, makes it easier to break into pieces at the end and means the spices can cling more readily to the surface which simply adds to the flavour! Rub the skin with salt, pepper and a little more than half of the cracked seeds, getting the seasoning right into all the cracks.

Scatter the remaining seeds into a roasting tin and put the meat on top. Put into the preheated oven and roast for 30 minutes, then turn the temperature down to 180C/Gas Mark 4 and cook for about 1 1/2 hours, until the juices run clear when the meat is pierced with a skewer and the skin has crackled to a beautiful golden brown. The reason for initially cooking it at such a high temperature is to give the crackling a good kick start, but if you don’t think it has crisped up enough at the end of the total cooking time, then just bang up the heat again and put the pork back in, checking it every few minutes until it has crisped up properly.

Leave to rest, uncovered, for about 20 minutes or so.

Remove the crackling from the pork before carving, then cut the joint into thick slices and break the crackling up into portions.

Belly Pork 2

I served the belly pork with some plain brown jasmine rice and a nice fresh shredded salad of beetroot, red cabbage, red onion, toasted cashew nuts and coriander and dressed it with a mixture of rice vinegar, a little soya sauce, mirin, finely chopped red chilli, sesame oil, sugar and a small pinch of salt. This shredded salad (or ‘slaw’, if you will) provided a lovely crunchy, zingy contrast to the rich pork which was most welcomed.

Belly Pork 3 Salad

Belly Pork 4 Salad


Belly pork is also wonderfully versatile, so can be served in lots of different ways. With rice, as I have done here, but even more classically, with mashed potatoes, apple sauce and steamed greens or cabbage.

The deciding factor though, is that even Destiny’s Child agree with me about how good this is. Let me refresh your memory.. “Spotted me a tender thang“, “Lookin’ hot, Smellin’ good“?! They’re talking about PORK! And all that talk about ‘jelly‘? Well, that’s just fat. Obvs.

Either way, it is just too good to not give it a whirl. Go on, do it for Beyoncé.

They were right you know, I don’t think I can handle how tasty this is. My mouth is watering just thinking about it!

The Glorious Galette

‘As easy as pie’. That has got to be one of the most misleading phrases in the world. Not that making a pie is difficult per se, but tender, flaky pastry does not come easily if the baker in question ain’t got skills. There’s the risk of a tough, over-worked crust or a soggy base if you’re not careful. If pie is so easy, then how come an amazing one is so hard to find? What is the solution?! I think somewhere along the line the French must have caught wind of this and created the galette; a free-form tart in which the pastry is simply rolled out and roughly folded around the edge of the filling. There we go, take away the formality of baking in a perfectly fluted pastry case and, BOOM.. easy. Facile as a french tart.

My first attempt at a galette was using quite an unusual fruit I spotted whilst doing my grocery shopping. The nectacot. Cross-pollination gives this little fruit the flavour of an apricot but with the juiciness of a nectarine, which as you can probably imagine tasted pretty good! After biting into this questionable specimen to deduce it’s calling in life, I decided that its sweet yet tart flavour and dense texture would lend perfectly to a simple fruit tart in which the fruit is the main attraction.

nectacots

Nectacot Galette (Serves 6-8)

For the flaky pastry

200g/6 1/2 oz plain flour (1 1/4 cups all-purpose)

1 Tablespoon caster sugar (superfine)

125g/4oz very cold butter, cut into 1/2 inch cubes

3 Tablespoons ice water, plus extra if needed

For the filling

125g/4oz (3/4 cup) ground almonds

60g/2oz (1/4 cup) caster sugar (superfine), plus 3 Tablespoons to sprinkle on before putting in the oven

finely grated zest of 1/4 lemon

1 large egg yolk

Roughly 600-700g (or 1.25 lb – 1.5 lbs) nectacots/nectarines, thinly sliced

15g (1 Tablespoon) butter, cut into small pieces

Method

To make the pastry: Measure the flour and sugar onto a large, flat work surface and spread out until about 1cm thick. Scatter the cubes of cold butter over the flour and toss a little flour over the butter so that your rolling pin doesn’t stick, and then get to rolling! Many pastry recipes call for the dough to be chilled before rolling, however this one benefits from being rolled out straight away.

butter & flour

When the butter starts flattening into long, thin sheets within the flour, use your hands or alternatively a bench scraper to bring in any remaining flour that has not yet been incorporated. Repeat the rolling and scraping 3 or 4 times before drizzling over the ice water. Mix with a fork until the dough is just about holding together and flatten into a disk.

Scrape your work surface clean and lightly dust with flour. Flatten the disk with 6-8 gentle taps of the rolling pin. Lift the dough and give it a quarter turn. Aim to handle the dough as little as possible as this will give you the flakiest crust! Continue to do this until you are left with a 30cm/12 inch circle. Place the dough onto a parchment lined baking sheet.

Dough

In a small bowl, stir together the ground almonds, the 60g caster sugar, lemon zest and egg yolk. Spread the mixture into a 20cm/8 inch circle in the centre of the dough.

Fan out the fruit over the almond mixture leaving a 4cm / 1.5 inch border of dough uncovered along the edge. Fold the edge of dough over the fruit, pleating it loosely and leaving the galette uncovered in the centre. Sprinkle the nectacots with the remaining 3 tablespoons of sugar and dot with the butter. Refrigerate the galette until the dough is firm, at least 30 minutes.

nectacot galette

galette

In the meantime, preheat the oven to 190°C/375°F. When out of the fridge, bake the galette for about 45-50 minutes until the crust is golden brown and the fruit tender.
Let cool for 20 minutes or so before serving.

I love this recipe for its simplicity and the fact that it is so versatile. The types of fruit you can use in this recipe is endless. Why don’t you try apples, pears, figs, plums or pineapple? Maybe even incorporate some dried fruit with the fresh. There are so many possibilities that I’m looking forward to trying out too. This rustic french tart with its deliciously flaky crust, vibrant crown of fruit and not to mention the moist almond interior is a dead cert winner.

galette

A Classic with a Twist. A citrusy twist.

A tall beauty I whipped up earlier.

OLYMPUS DIGITAL CAMERA

Victoria Sponge with Cherry Lime Jam

270g butter, softened but not melted

270g caster (superfine) sugar (plus a small handful for sprinkling onto the cake at the end)

4 large eggs

1 teaspoon vanilla extract or vanilla bean paste

270g self-raising flour

1/4 teaspoon baking powder

1 tablespoon milk

A couple of generous spoonfuls of cherry jam

Juice of half a lime

Medium tub double cream (About 275ml or 1 cup)

Method

Preheat the oven to 180°C/350°F/Gas 4.

Grease two round 7-8 inch (18-20cm) sandwich tins with a little softened butter and line the base of both with baking parchment.

Sift the flour and baking powder into a bowl.

Cream together the butter and sugar until pale and fluffy. You can do this using an electric hand mixer or the more traditional way, with a wooden spoon. Either way cream it for a good 10 minutes as it really makes all the difference to the finished texture of the cake. It’ll be worth it, just you wait and see! I like to crack out a book at this point for a little light reading whilst my other hand is being productive with the electric mixer. However sometimes I watch the creaming process like a good tv show. Sad, but true.

Add the eggs in one at a time beating well after each one until fully incorporated. You might want to add a little spoonful of flour in after each egg to ensure the mixture doesn’t curdle. Mix in the vanilla extract or paste.

Fold in the flour mixture about a third at a time until fully incorporated. Don’t overmix it though, for your own sake and for my peace of mind (please and thank-you!), as doing that will only go and undo all your hard work and result in a tough cake. Not tasty. Not tasty at all.

Finally, add in the tablespoon of milk to loosen the cake mixture a bit. It should have a nice dropping consistency where it falls slowly off the spoon. Divide the mixture between the two cake tins and bake for about 25 minutes until golden brown and a skewer inserted into the centre comes out clean. Let the cakes cool for about half an hour before turning them out of their tins and peeling off the parchment paper. Now leave the cakes to cool fully, on a cooling rack if you want to be proper.

When you’re ready to assemble the cake mix the jam with the lime juice. (If you want to go down the more traditional route opt for good old raspberry jam.) I like to do this because I love the flavour of the black cherry jam but wanted it to be a little more tart on this occasion. The jam does become a little thinner but that isn’t really a problem for the simple reason that a cake oozing with jam cannot be a bad thing. This also happens because I happen to like using a lot of jam.

Whip the cream until quite firm. Now flip one of the cakes upside down and spread it with the jam. Spoon the cream on top of the jam and spread a little (or pipe it if you’re feeling that way inclined. Some days you just feel a little fancier, right?).
Top with the other cake the right way up this time and sprinkle with caster sugar.

All that’s left to do now is put on the kettle for a nice cup of tea and in approximately 5-10 minutes you’ll be chowing away on a little slice of heaven! Best served with good company.

* The rule of thumb when making a Victoria sponge is to weigh the eggs (still in their shell) and use the same quantity of butter, sugar and flour, something to bear in mind if you want to make a different sized cake. Just change the size of the cake tin as appropriate, so if you make one with 5 eggs a 9 inch tin might be best or for a 3 egg cake I probably wouldn’t go bigger than a 7 inch cake tin. It’s nice if the cake has a good bit of height.

Absolute Ambrosia

Before you start thinking I’m about to give you a recipe with a method of,

‘1. Grab a tin opener.

2. Open the tin.

3. Serve. Enjoy your bowl of rice pudding folks!’

I must stop you in your tracks. This pudding could most definitely be defined as ambrosia, in the ‘food of the gods’ sense only though, as it has way too much personality (and rice for that matter) to be affiliated with that from the can. In saying that I really don’t mind the tinned stuff too much but when compared with this toothsome beauty it suddenly becomes redundant.

Rice Pudding 1

There are days where only a bowl of warm homemade rice pudding will do and this one ticks all of the boxes. The aroma that filled my kitchen whilst making this was so heavenly I struggle to find the words to do it justice. This coconut rice pudding, infused with pandan and just a hint of vanilla, was subtle yet somehow the flavours were distinct enough to evoke the beautiful flavours I have tasted whilst visiting family in Malaysia. Pandan is a tropical plant which is used widely throughout Southeast Asian cuisine as a flavouring or, when blended with a little water, a vibrant green food colouring. It can be used in either sweet or savoury dishes and is complemented wonderfully by coconut. I find this recipe works incredibly well using sushi rice, not only just in keeping with the other asian ingredients I have included here but mainly because the grains are lovely and plump, making it texturally very satisfying to eat.

Rice Pudding 2

Coconut Pandan Rice Pudding (Serves 6)

2 Tablespoons sunflower oil

200g (7 oz) sushi rice or regular short-grain rice

1.25 litres (44 Fl oz/5 cups) full fat milk

250ml (1 cup) coconut milk

1 pandan leaf, folded in two and knotted

1 teaspoon vanilla bean paste or a vanilla pod

60g caster (superfine) sugar (2oz)

Method

Heat the oil in a heavy based pan then add the rice and gently stir to warm it and coat the grains. Add the milk, coconut milk, knotted pandan leaf and vanilla bean paste (if using a vanilla pod just split it in two, scrape out the sticky black seeds with the back of the knife and add it to the pot along with the split pod). Bring to the boil. Lower the heat and simmer for about 10 minutes, stirring quite often so that it doesn’t stick to the bottom of the pan.
Add the caster sugar, then let it simmer for another 10-15 minutes stirring frequently as before until the rice is tender and has a nice thick consistency.

This is delicious eaten warm, although it also makes a mighty tasty breakfast the following day with a healthy spoonful of jam! Although I’m usually a raspberry jam kind of girl I opted for a high fruit strawberry jam this time around.
Next time I might be tempted to try pineapple for a more authentic combination, although any type will do really depending on your preference and what you happen to have on hand!

Rice Pudding 3